Admin System
This document provides a comprehensive overview of the Admin System in SimOne Team Edition, covering its functional modules and usage.
The Admin System serves as the platform's central configuration hub, primarily accessible to super administrators. It provides unified management and maintenance of account systems, permission assignments, access control, and core system settings.
Through the Admin System, administrators can achieve three core objectives: fine-grained control over user roles, secure isolation of resource access, and flexible configuration of platform runtime parameters — ensuring overall system stability, scalability, and collaboration efficiency.
Note
The Admin System is exclusively available for SimOne Team Edition and does not apply to SimOne Enterprise Edition.
1. Basic Management
The Basic Management module provides unified management of the platform's account system and permission configurations. Through this module, super administrators can centrally manage user accounts, flexibly configure business access permissions, and define the scope of admin privileges — ensuring platform security and controllability.
1.1 Account Management
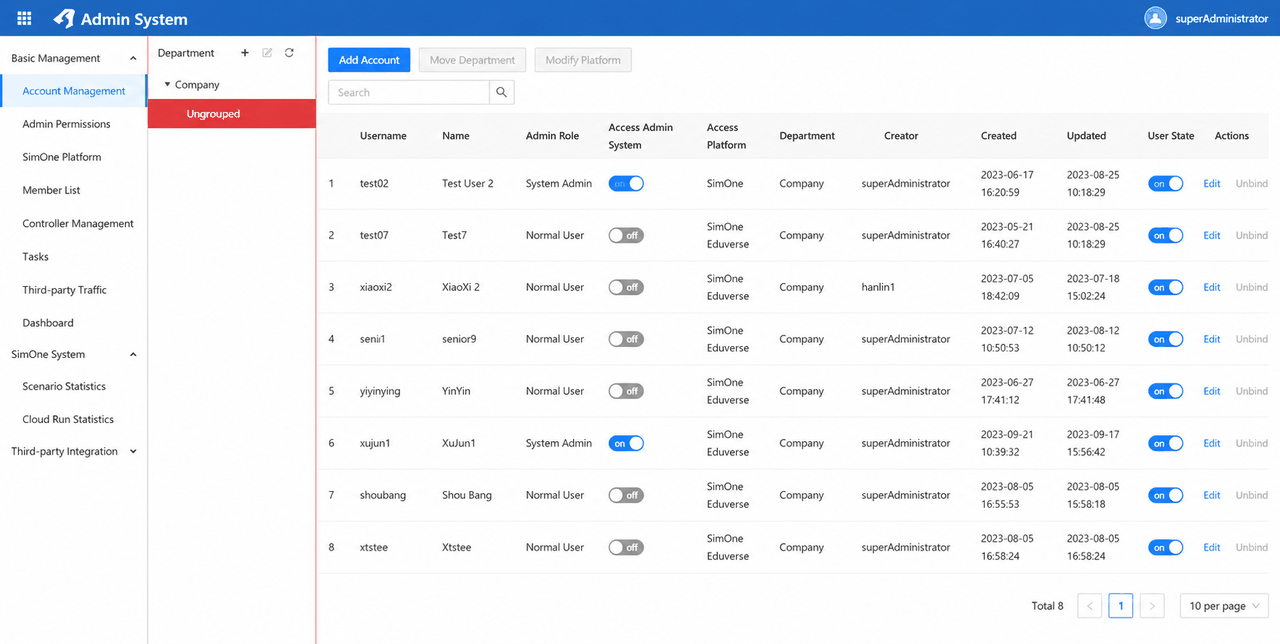
In the Admin System, click the button on the left sidebar to enter the Account Management module. This module supports fine-grained management of organizational structures and user accounts, with two core functional categories:
- Department Management: Supports creating, editing, and deleting department records.
- Account Management: Supports adding and editing accounts, setting account status, and assigning roles and permissions.
1.1.1 Department Management
In Department Management, users can add organizational hierarchy levels to group accounts by department.
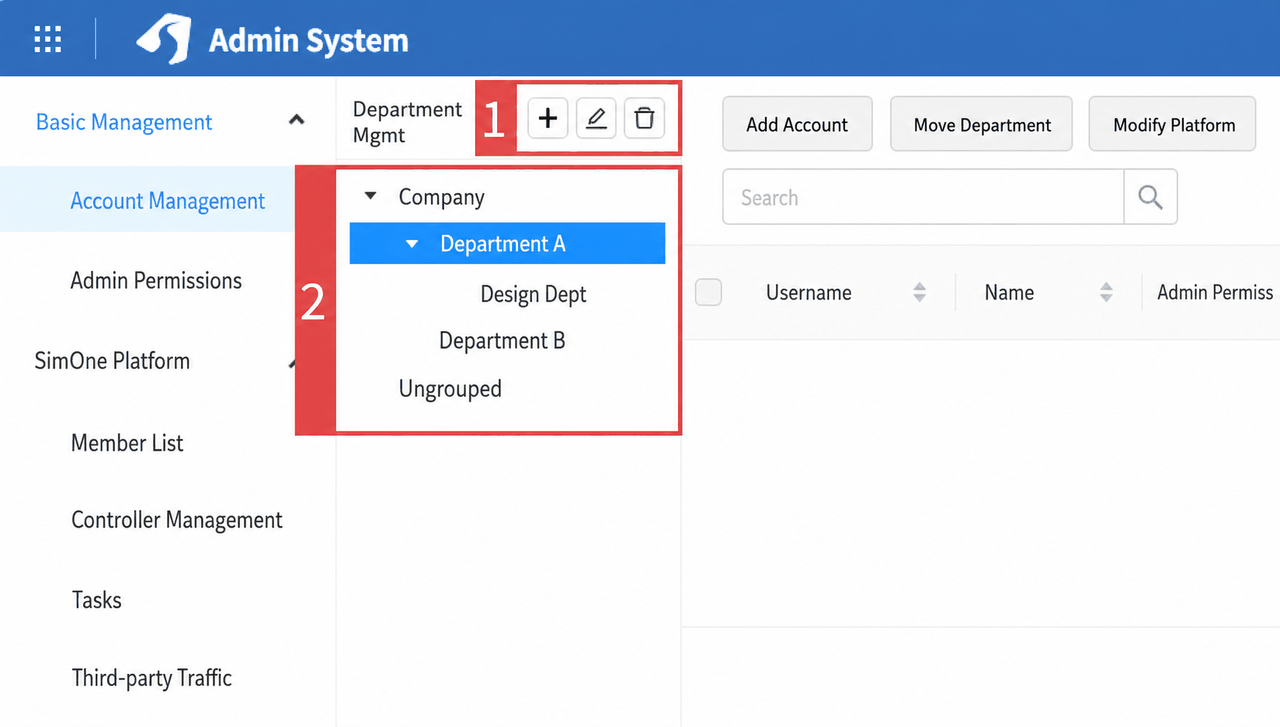 Departments can be created, modified, and deleted according to the following rules:
- Entry point: Click the Add or Edit button to open a dialog where department information can be added or modified.
-
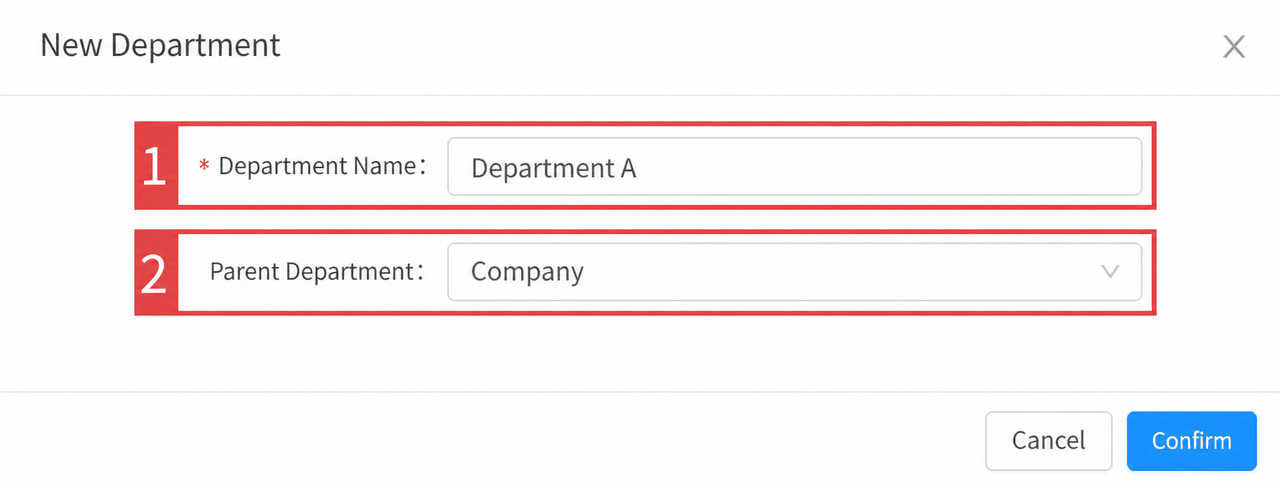
Key configuration fields:
-
Department Name: Empty by default; supports custom input. Department names must be unique within the same level.
- Parent Department: Defaults to "Company". Click the dropdown to expand the department hierarchy tree and select a parent department.
- Department Display: Shows the department hierarchy tree for easy browsing. When a department node is selected, the account list on the right refreshes automatically to show only accounts belonging to that department and its sub-departments.
1.1.2 Account Management
Note
Users of SimOne Team Edition cannot self-register. Only super administrators or admin system administrators can create user accounts.
In the Account Management module, users can manage system accounts, including adding and editing accounts, setting account status, and assigning roles and permissions.
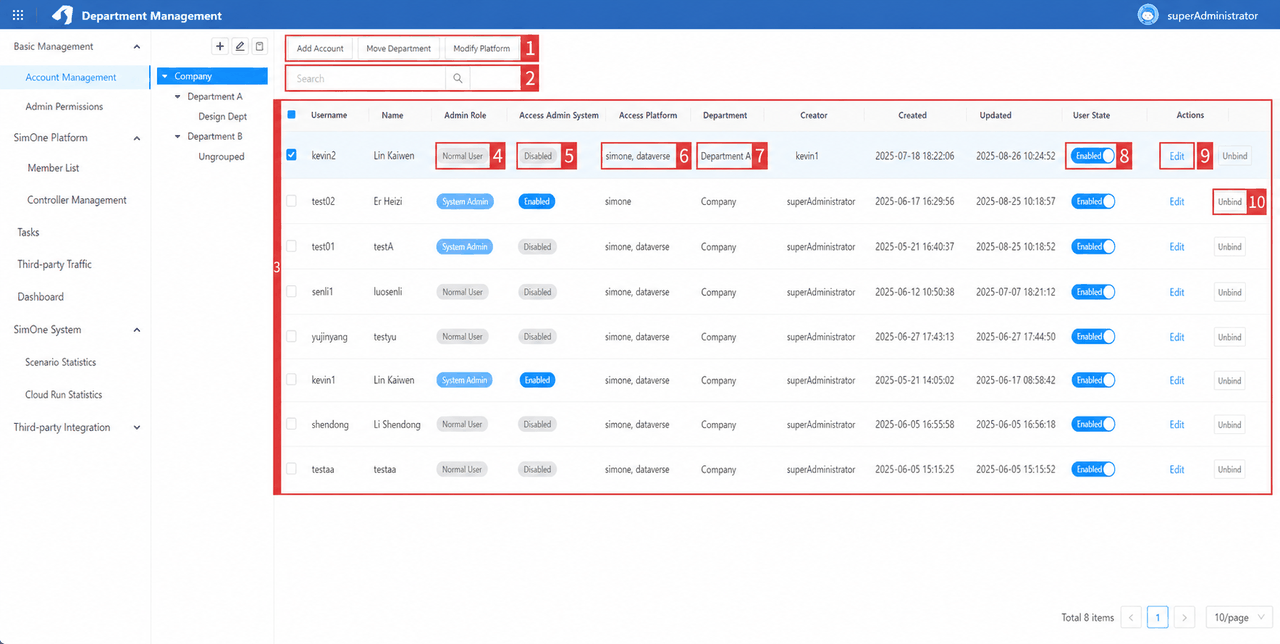
| ID | Feature | Description |
|---|---|---|
| 1 | Operations | Supports adding accounts, moving departments, and modifying business platform access. Select one or more accounts to batch-move their department or update their accessible business platforms. |
| 2 | Search | Supports fuzzy search by username or display name. |
| 3 | Account List | Displays the account list with pagination. |
| 4 | Admin Role | Shows the current account's admin role. When admin system access is enabled for an account, the role determines which functional modules of the Admin System the account can access and operate. |
| 5 | Admin System Access | Enables or disables the account's login permission to the Admin System. |
| 6 | Business Platform Access | The Admin System manages multiple 51Sim product lines in a unified manner. For the platforms deployed for each user, the admin can configure which business platforms an account is allowed to log in to and access. Use the Modify Business Platform button for batch updates. |
| 7 | Department | Shows the department the account belongs to. Use the Move Department button for batch updates. |
| 8 | Account Status | Enabled by default. When disabled, the account is not allowed to log in to the Admin System or any business platform. |
| 9 | Edit | Click to open the account information editing dialog. |
| 10 | Unlock | When an account is locked due to repeated incorrect password attempts, click this button to unlock it. |
1.1.2.1 Create Account
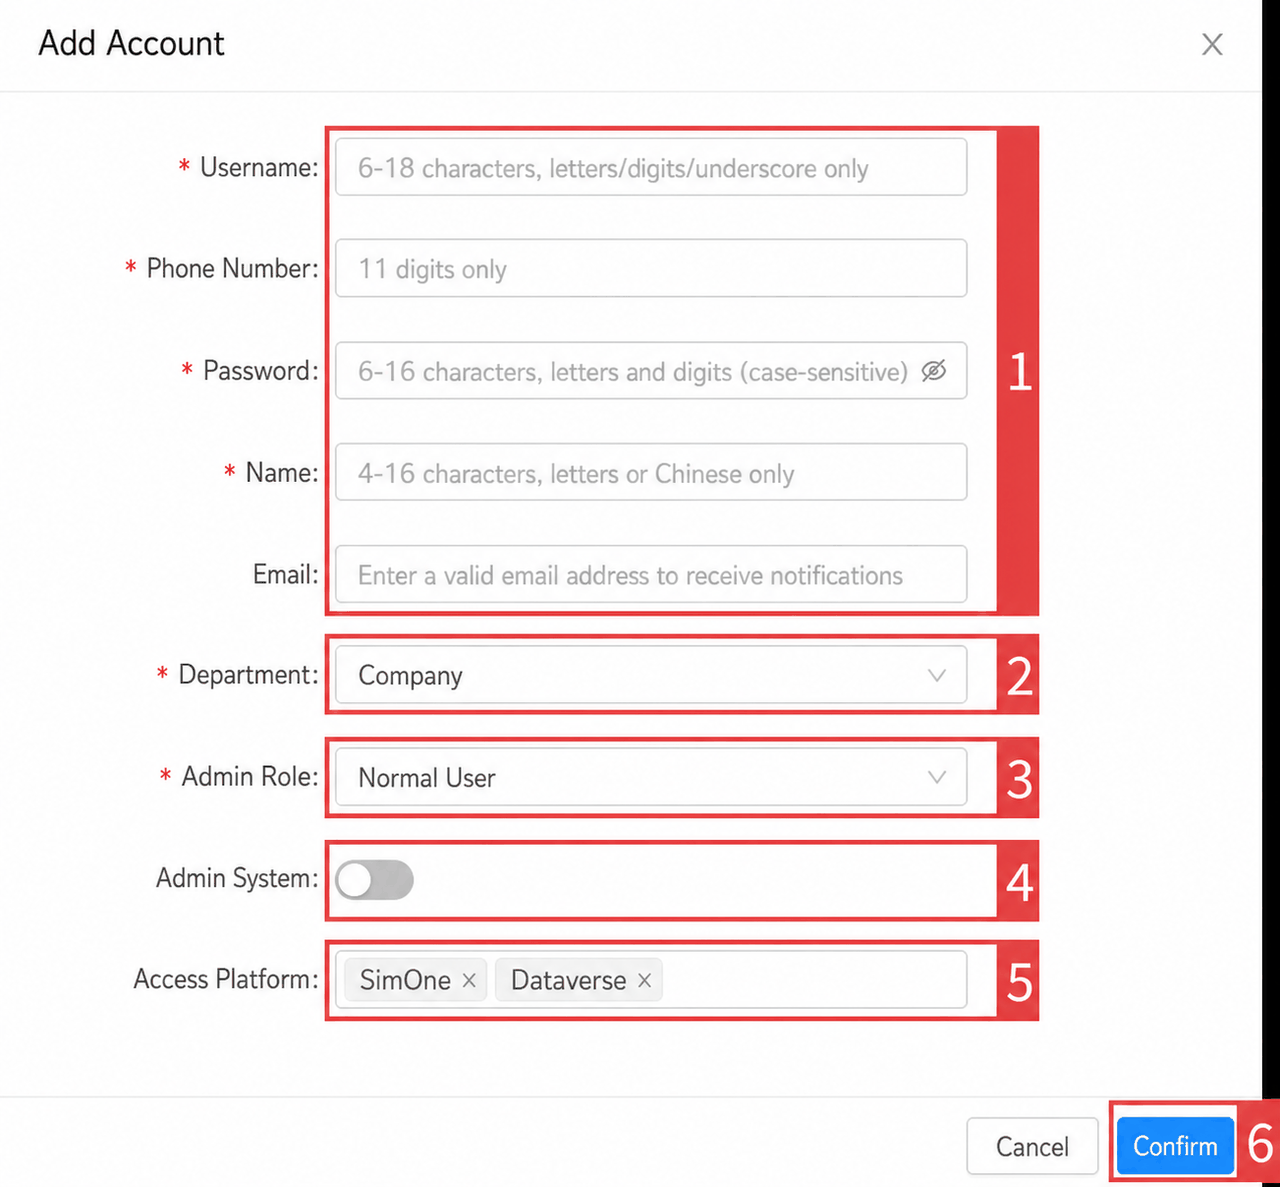
In the Account Management module, click the Add Account button at the top to open the account creation dialog.
- Basic Information: Fill in the username, phone number, password, display name, and email.
- Department: Click the dropdown to expand the department hierarchy tree and select the account's department.
- Admin Role: Defaults to "Regular User". If the account needs to assist the super administrator in managing the Admin System, click to expand the admin role list and assign an appropriate role.
- Admin System Access: Disabled by default; the account is not allowed to log in to the Admin System.
- Business Platform Access: Defaults to "Access to all business platforms". Click the dropdown to change the selection.
- Finish: Click OK to return to the list and view the newly added account.
1.1.2.2 Edit Account
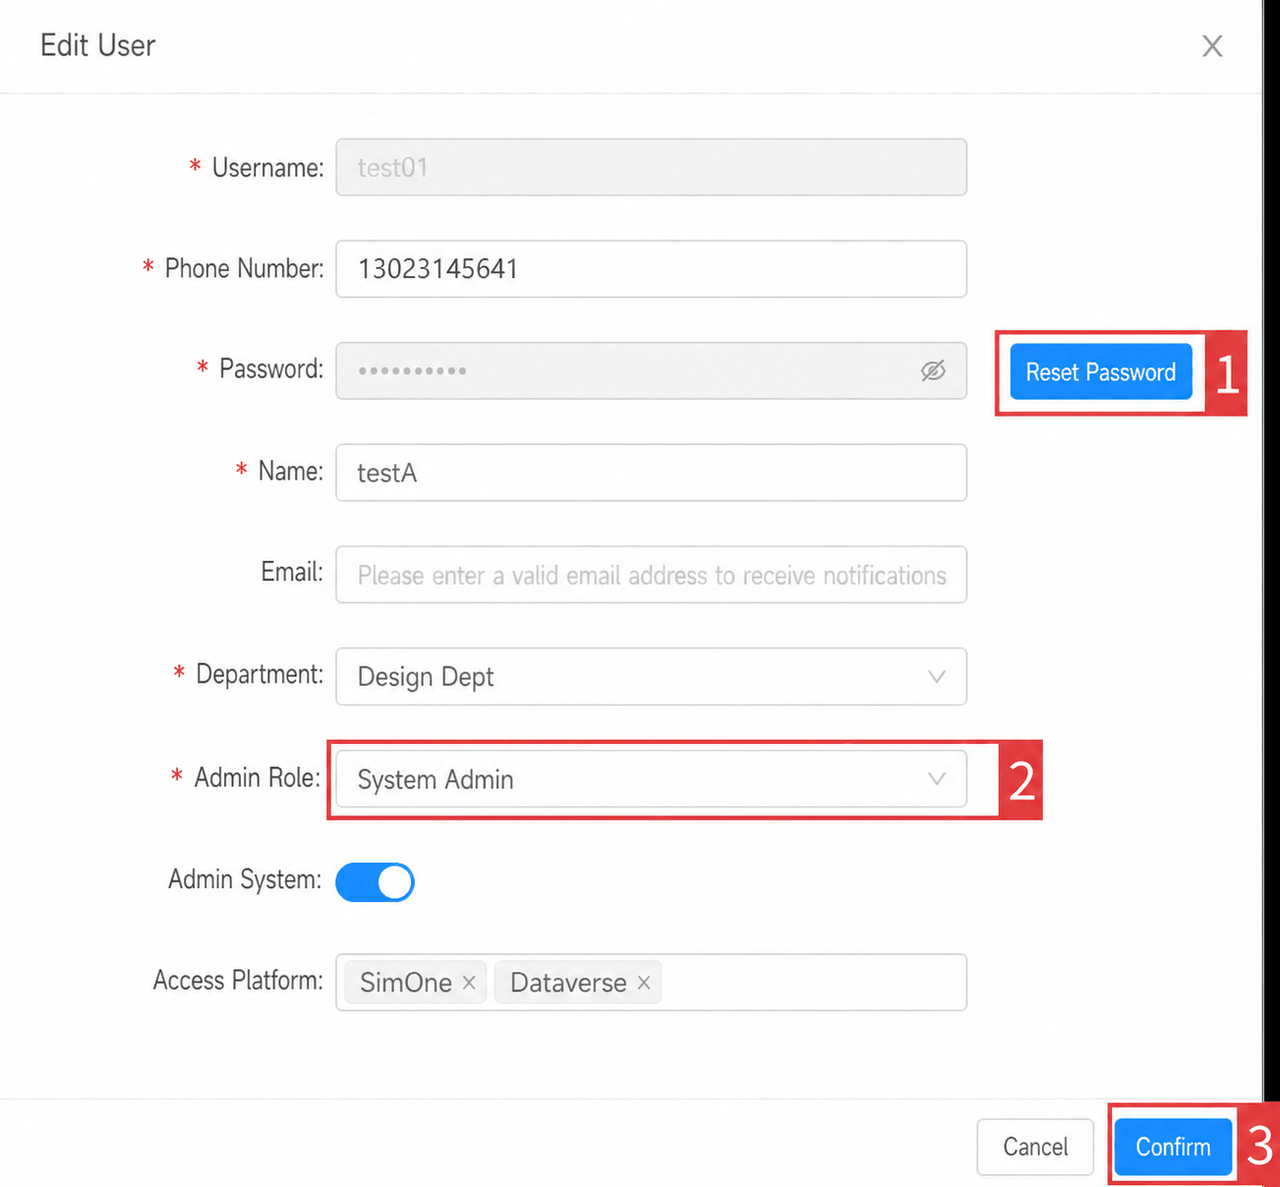
In the Account Management module, select an account and click the Edit button in the action column on the right to open the account editing dialog.
- Basic Information: Supports modifying the account's phone number, display name, and email. Click Reset Password to reset the account password.
- Admin Role: To grant admin permissions to an account, enable Admin System Access and add a role in the admin permissions section, then configure the corresponding module operation permissions.
- Finish: Click OK to save the changes and close the dialog, returning to the account list.
2. Admin Permissions
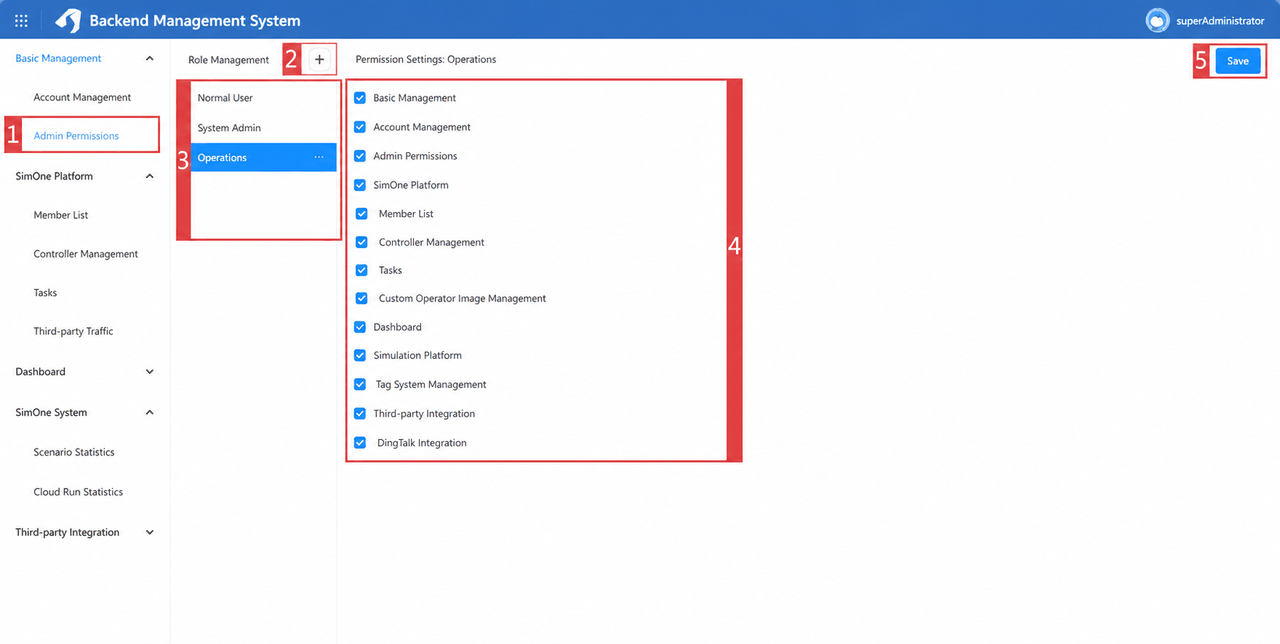
In the Admin System, click the button on the left sidebar to enter the Admin Permissions module. This module supports managing admin roles and allows fine-grained configuration of the accessible functional modules for each role.
| ID | Feature | Description |
|---|---|---|
| 1 | Admin Permissions | Click the button to open the Admin Permissions module page. |
| 2 | Add | Click the button to add a new admin role. |
| 3 | Role List | Displays the current list of admin roles. Newly added roles support rename, delete, and copy operations. |
| 4 | Permission Settings | For the selected role, shows the configured access permissions for each functional module and supports modification. |
| 5 | Save | After modifying the module permission configuration for a role, click this button to save the changes. |
3. SimOne Platform Management
3.1 Member List
In the Admin System, click the button on the left sidebar to enter SimOne Platform Management > Member List. This module displays the list of accounts that can log in to and access the SimOne platform. It supports setting the maximum concurrent cloud task count for individual or multiple accounts.
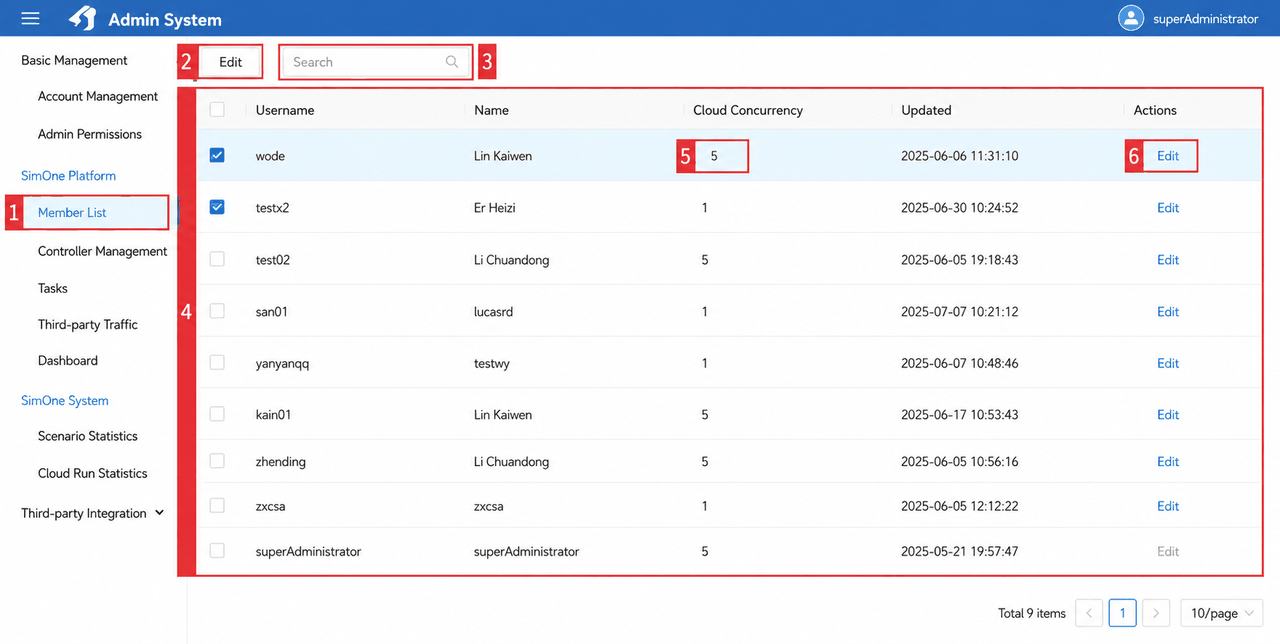
| ID | Feature | Description |
|---|---|---|
| 1 | Member List | Click the button to open the SimOne Platform Member List module page. |
| 2 | Edit | Grayed out by default. When multiple accounts are selected, supports batch-updating the maximum number of concurrent cloud tasks. |
| 3 | Search | Supports fuzzy search by username or display name. |
| 4 | Account List | Displays the list of accounts that can log in to and access the SimOne platform. |
| 5 | Cloud Concurrency | Shows the maximum number of concurrent cloud tasks for each account. |
| 6 | Edit | For the selected account, allows modifying the maximum number of concurrent cloud tasks. |
3.2 Controller Management
Note
Controllers are the carriers of algorithms. Configuring different controllers makes it easy to categorize and test different algorithms in use cases. Controller Management is only available for SimOne Team Edition. For SimOne Enterprise Edition, controllers are configured in System Settings.
In the Admin System, click the button on the left sidebar to enter the Controller Management module. This module supports unified management of all controllers on the SimOne platform.
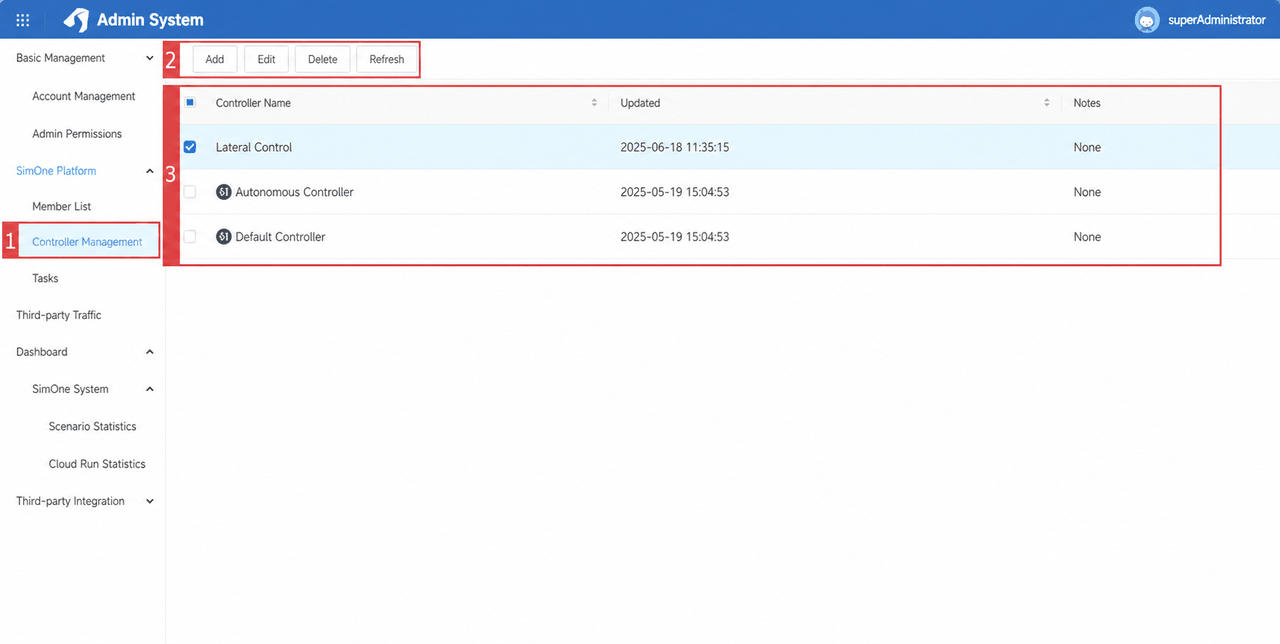
| ID | Feature | Description |
|---|---|---|
| 1 | Controller Management | Click the button to open the Controller Management module page. |
| 2 | Operations | Supports creating, editing, and deleting controllers. Click Refresh to reload the controller list. |
| 3 | Controller List | Displays the current controller list, including controller name, update time, and notes. |
3.2.1 Create / Edit Controller
In the Controller Management module, click the New or Edit button at the top to open the controller management dialog.
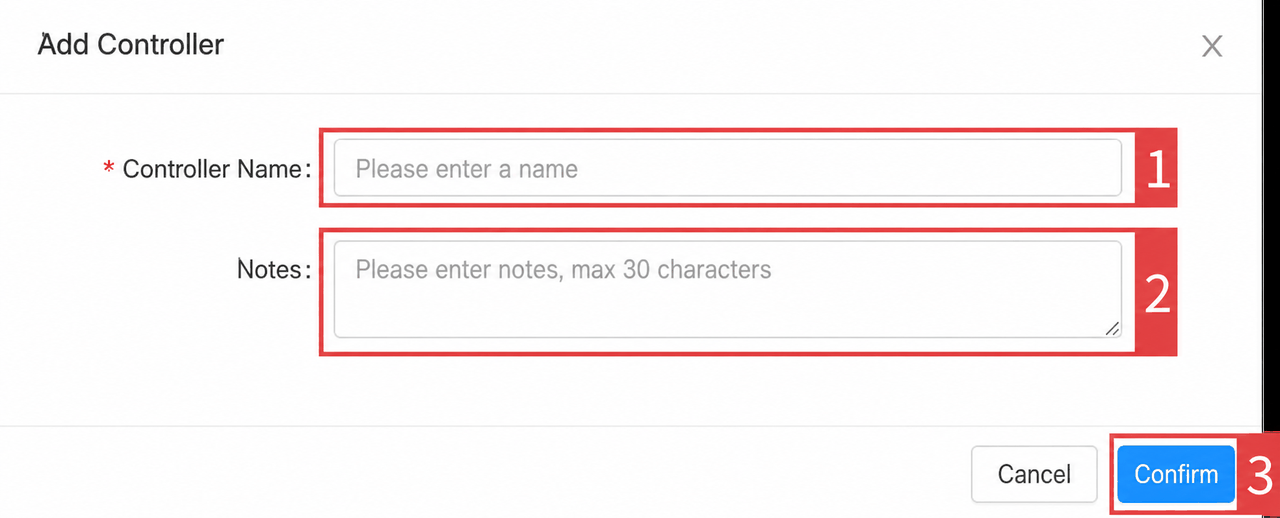
- Controller Name: Supports custom controller names. Names must be unique within the list.
- Notes: Supports adding notes for the controller.
- Finish: Click OK to return to the list and view the newly added controller.
3.2.2 How Controllers Are Used
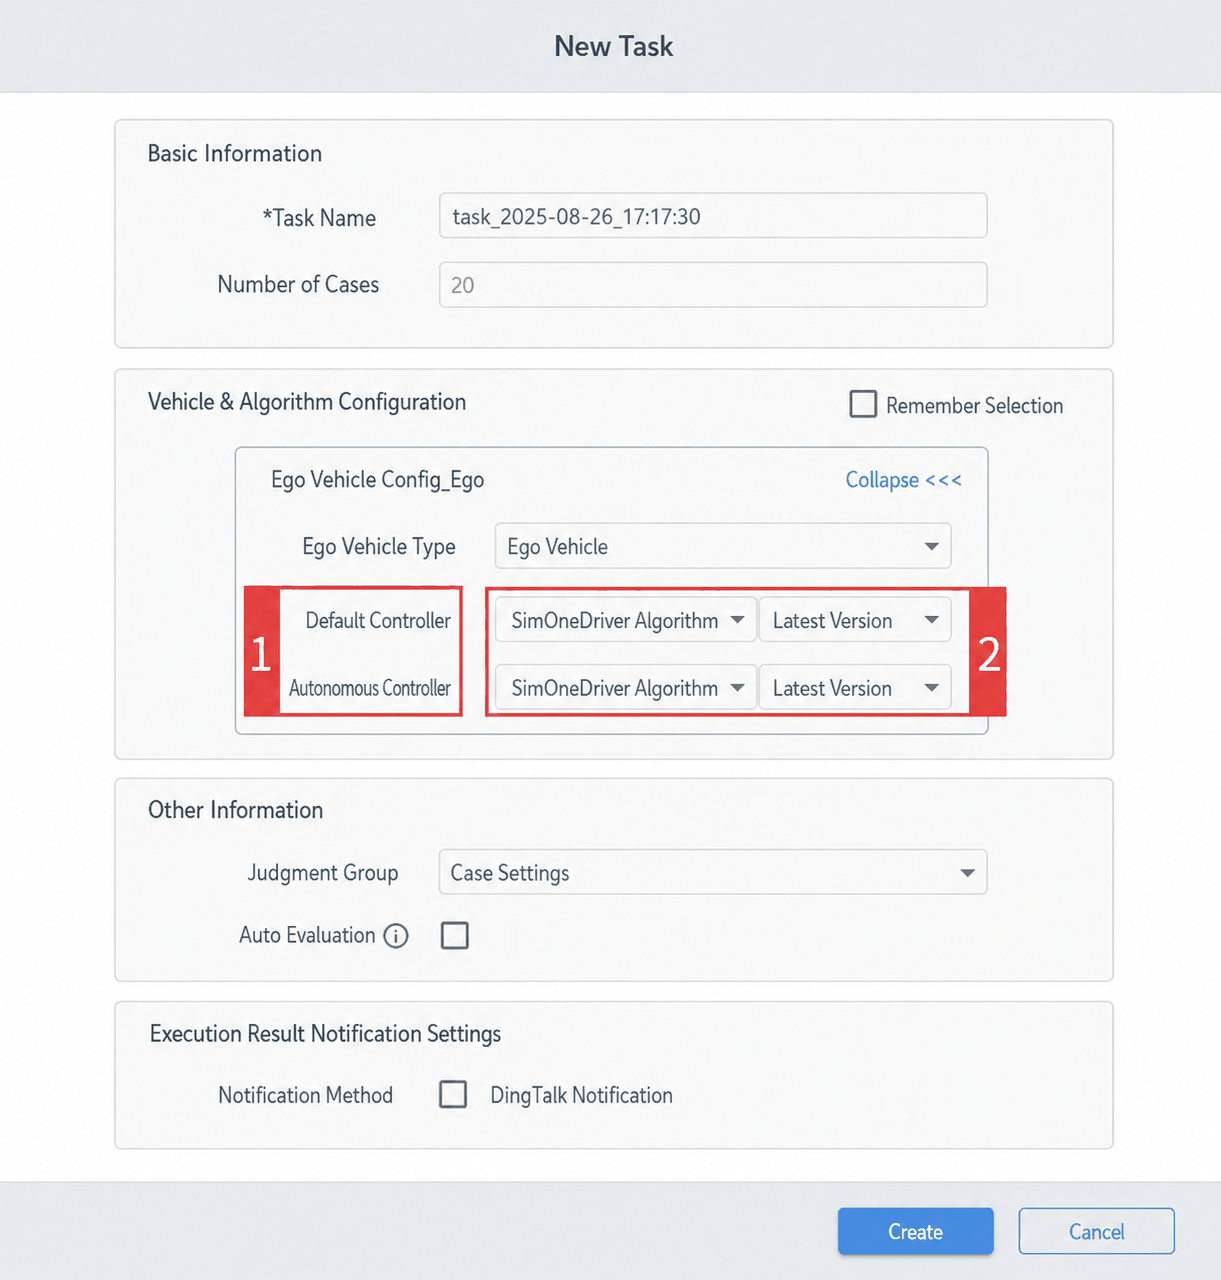
In the Controller Management module of the Admin System, administrators can add and maintain controller information centrally. When users configure the Ego Vehicle Controller in the use case editor, they can select directly from the pre-configured controller list, ensuring standardization and reusability of control logic.
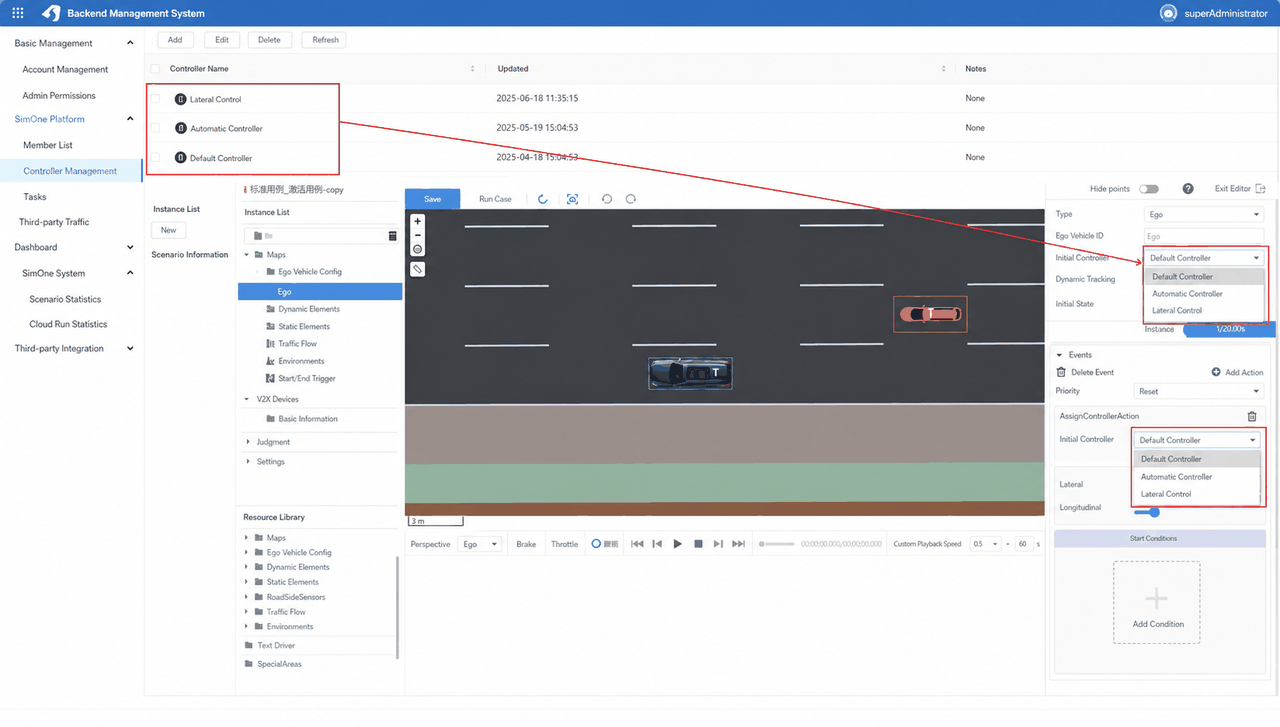 When running use cases in batch, the system aggregates and displays use cases by the controller assigned to the Ego Vehicle, allowing users to configure the corresponding algorithm and version for each controller in a unified view. This mechanism enables rapid switching between algorithm versions across batch use cases, providing a stable and controlled environment for regression validation during algorithm iteration, and facilitating quick comparison of differences between versions through task results.
- Controller Aggregation: In the task creation interface, the system automatically deduplicates and aggregates use cases by their Ego Vehicle controller, presenting a consolidated view so users can configure the corresponding algorithm for each controller in one place.
- Algorithm & Version Configuration: In the task creation interface, users can assign an algorithm to each controller and select a specific version of that algorithm, enabling flexible configuration and rapid switching.
3.3 Task Management
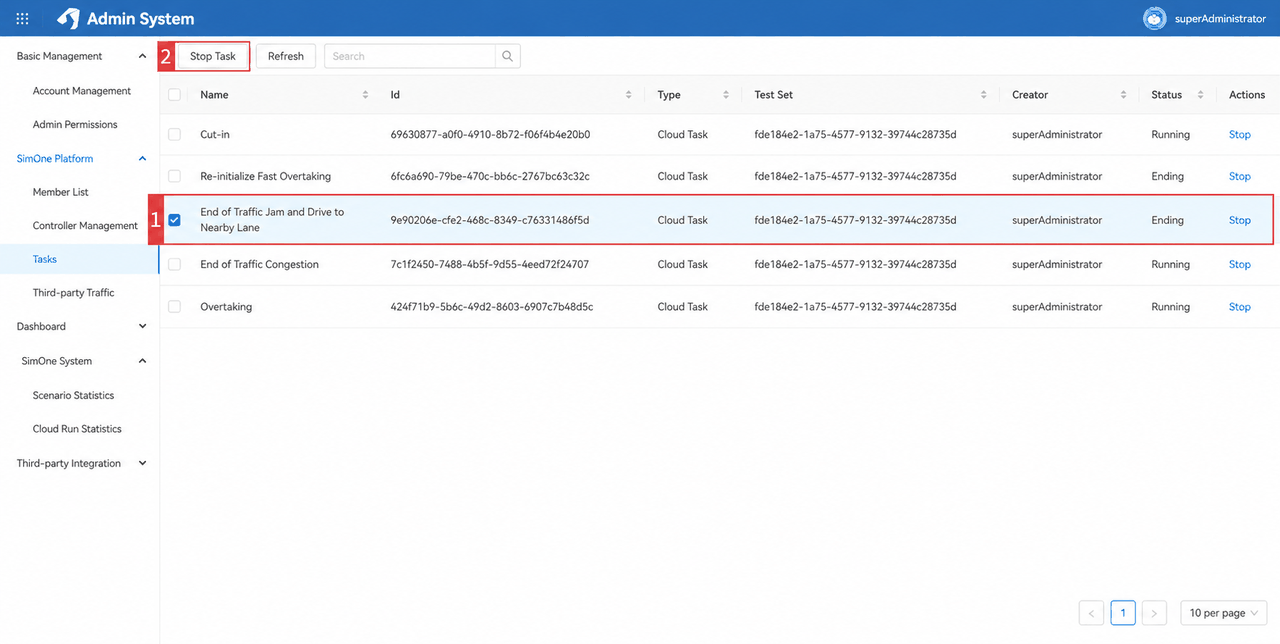
In the Task Management module of the Admin System, administrators can monitor cloud tasks being run by users in real time and force-terminate tasks when necessary.
Note
Only cloud tasks created by users can be viewed and terminated. Local tasks cannot be viewed or terminated.
3.3.1 View User Tasks
- Assume a cloud user has started multiple tasks.
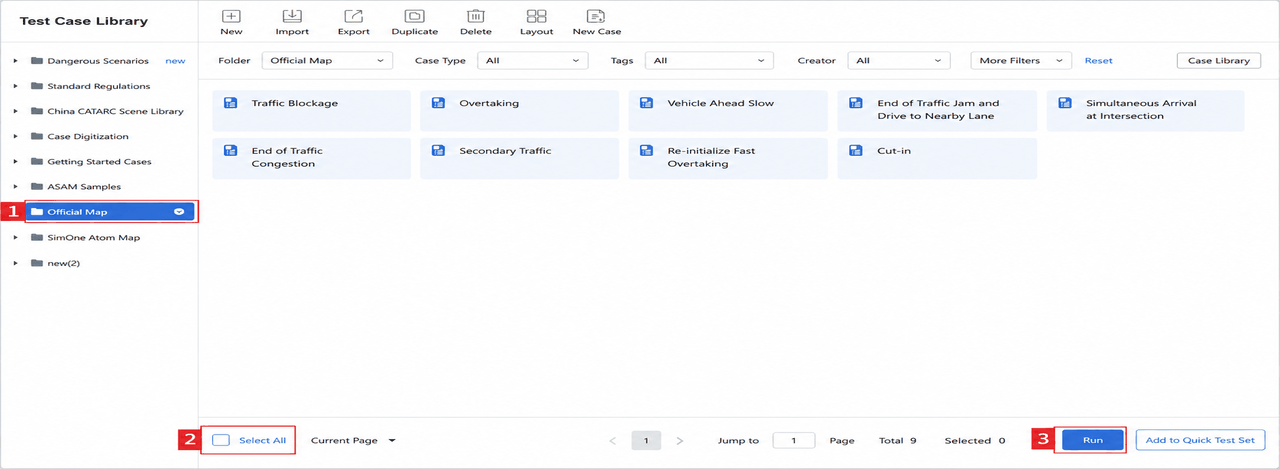
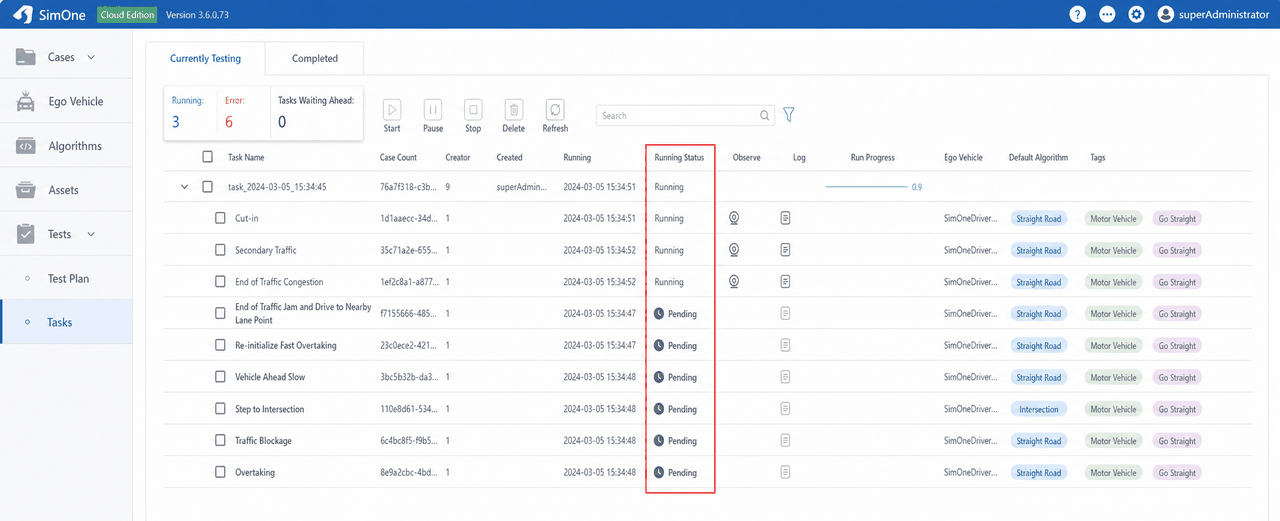
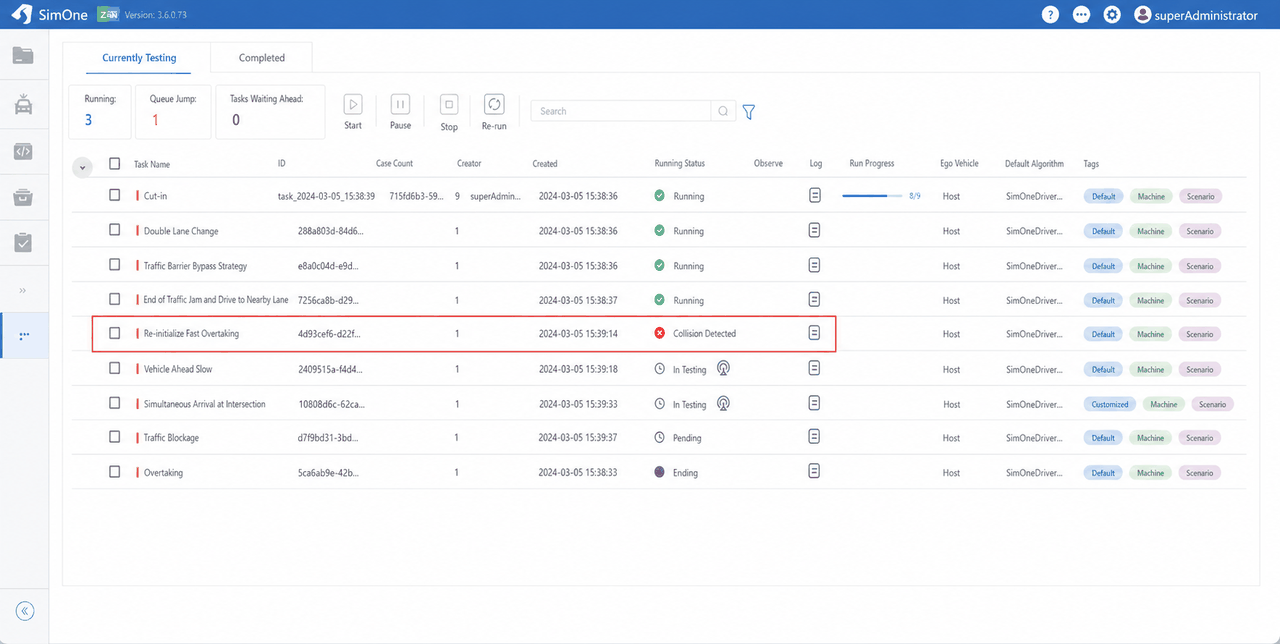
- The running use cases can be confirmed in the user-side Task Management view.
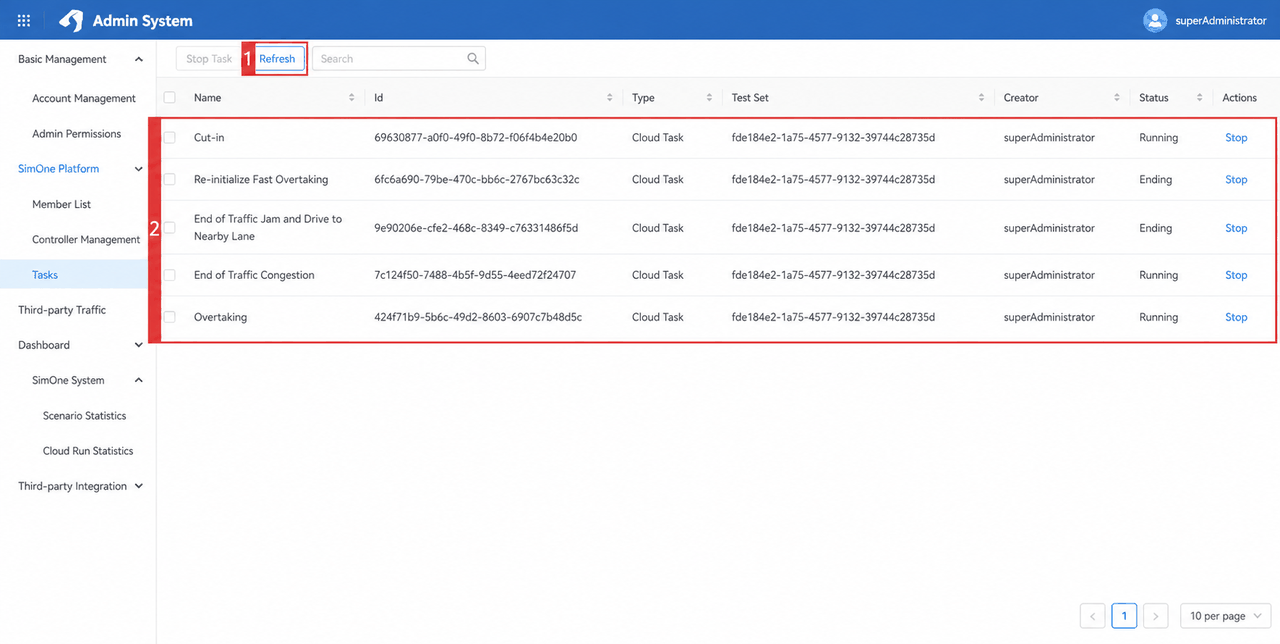
- In the Task Management module of the Admin System, click Refresh to see the use cases currently running on the user side.
3.3.2 Terminate User Tasks
- In the Task Management module of the Admin System, check the checkbox to the left of a task name to select it.
- Click Stop Task in the upper-left corner.
- In the user-side Task Management view, the task is now shown as manually terminated.
3.4 Third-Party Traffic Flow Management
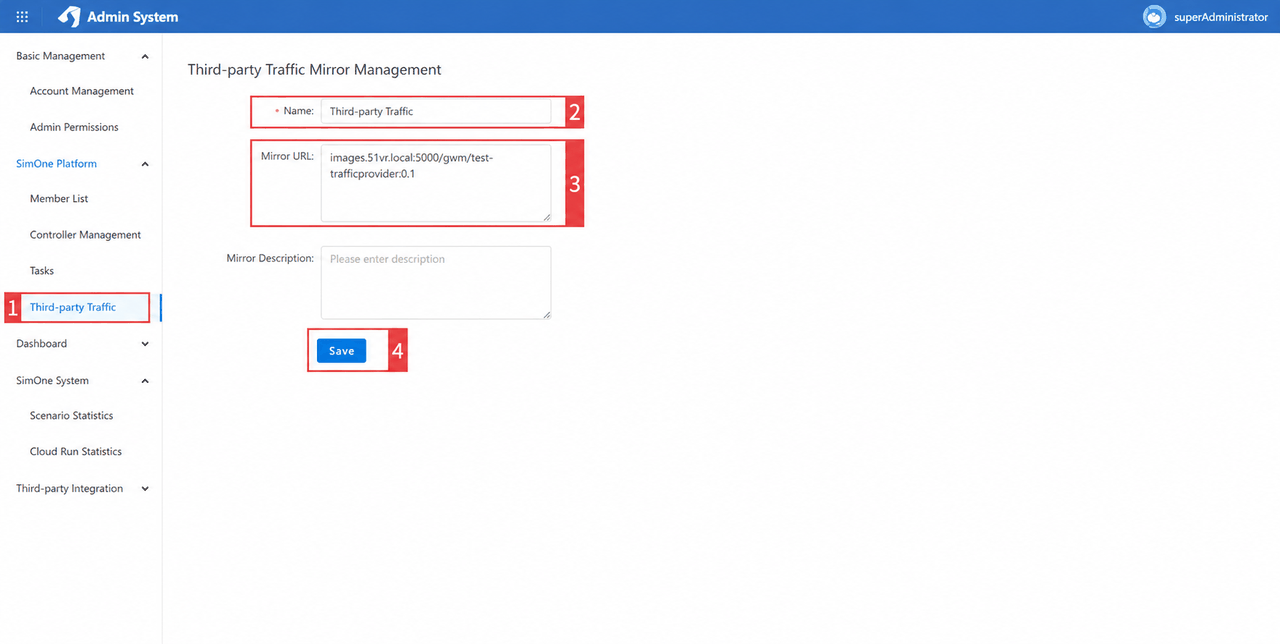
In the Third-Party Traffic Flow Management module of the Admin System, administrators can centrally manage third-party traffic flow models integrated via Docker images. All cloud-run use cases that use the API integration method for traffic flow will use the unified traffic flow model configured here.
Note
For cloud tasks, this setting only takes effect for use cases in which the traffic flow is set to API integration mode.
| ID | Feature | Description |
|---|---|---|
| 1 | Third-Party Traffic Flow Management | Click the button to open the Third-Party Traffic Flow Management module page. |
| 2 | Name | Supports custom names for traffic flow models. |
| 3 | Image URL | Supports entering the Docker image address for the custom traffic flow model. |
| 4 | Save | Click the button to save the entered or modified information. |
4. Data Dashboard
4.1 SimOne System
In the Data Dashboard module of the Admin System, users can get an overall view of SimOne platform usage through aggregated charts.
4.1.1 Scenario Overview
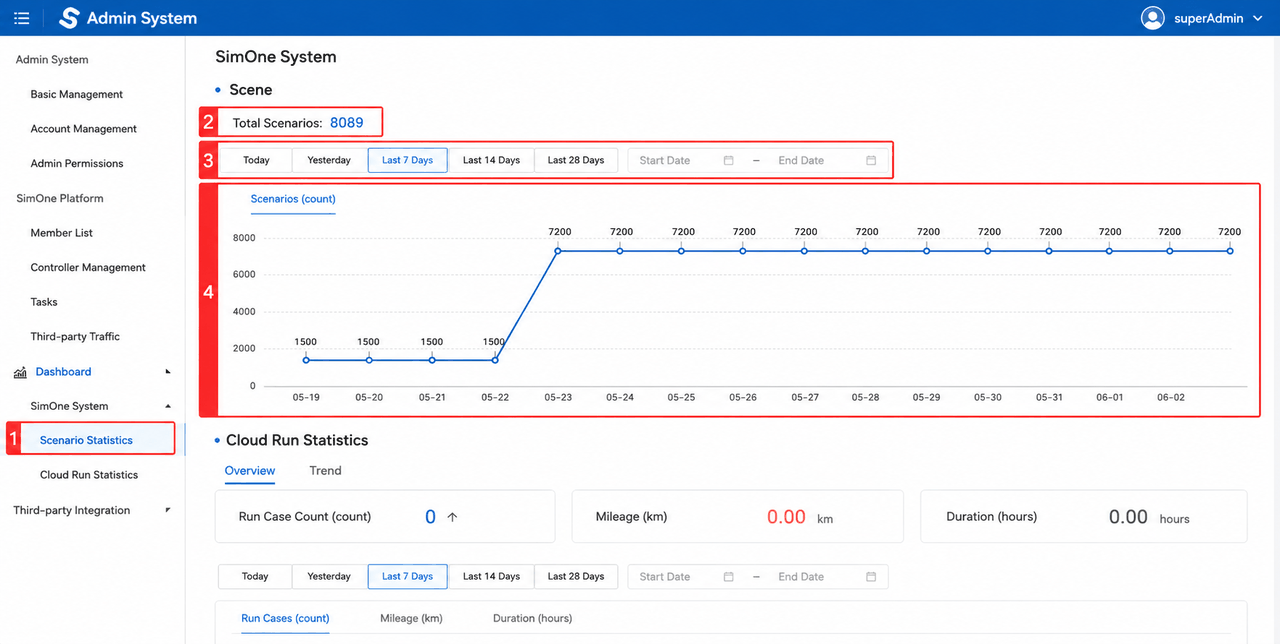
In the Scenario Overview statistics module, the system aggregates the total number of use cases on the SimOne platform and displays the trend of use case counts over time, helping users track use case growth, analyze test coverage progress, and understand platform usage.
| ID | Feature | Description |
|---|---|---|
| 1 | Scenario Overview | Click the button to view the use case summary statistics for the SimOne platform. |
| 2 | Total Use Cases | Displays the total number of use cases on the SimOne platform. |
| 3 | Filter | For the use case count chart, users can filter data by Today, Yesterday, Last 7 Days, Last 14 Days, Last 28 Days, or a custom date range. |
| 4 | Chart | A line chart showing the trend of use case data volume over time. |
4.1.2 Cloud Run Overview
In the Cloud Run Overview statistics module, the system aggregates the number of cloud task use cases, mileage, and run duration on the SimOne platform, and displays the trend of task counts over time, helping users track cloud task growth.
Note
For SimOne Team Edition, the system only aggregates statistics for cloud tasks created by users.
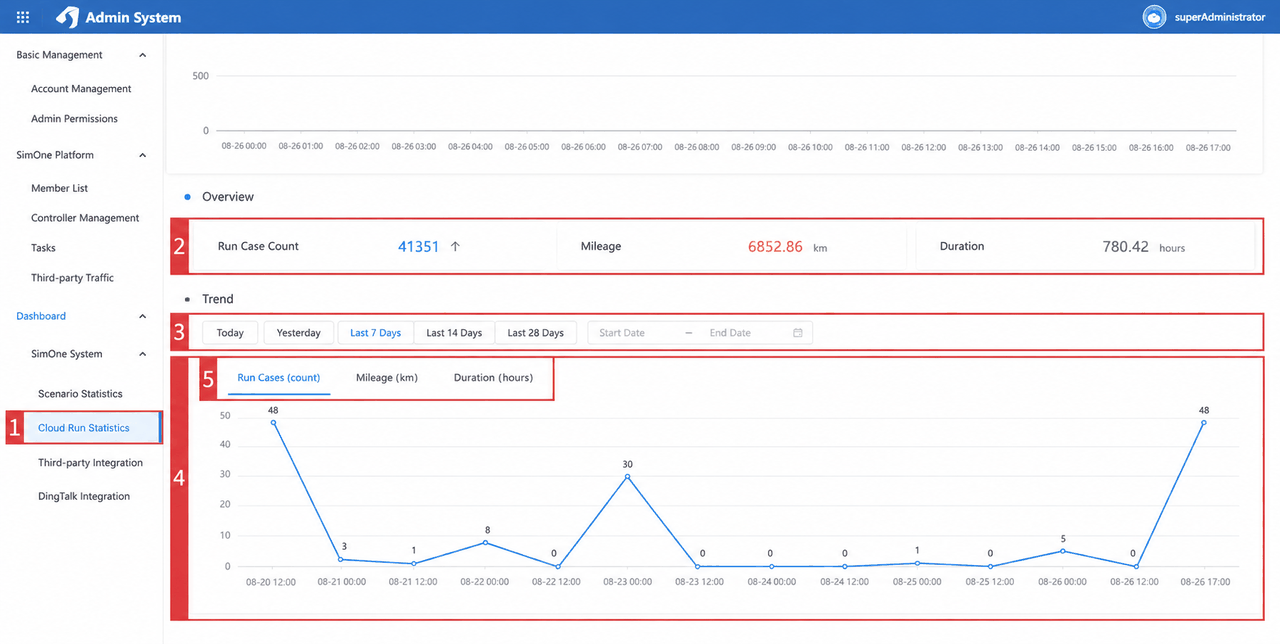
| ID | Feature | Description |
|---|---|---|
| 1 | Cloud Run Overview | Click the button to view the cloud task summary statistics for the SimOne platform. |
| 2 | Summary | Aggregates and displays the number of cloud-run use cases, total mileage, and total run duration. |
| 3 | Filter | For the task run count chart, users can filter data by Today, Yesterday, Last 7 Days, Last 14 Days, Last 28 Days, or a custom date range. |
| 4 | Chart | A line chart showing the trend of cloud-run use cases over time. |
| 5 | Chart Options | Supports displaying the trend of user use case count, run mileage, and run duration over time. |
5. Third-Party Integrations
5.1 DingTalk Integration
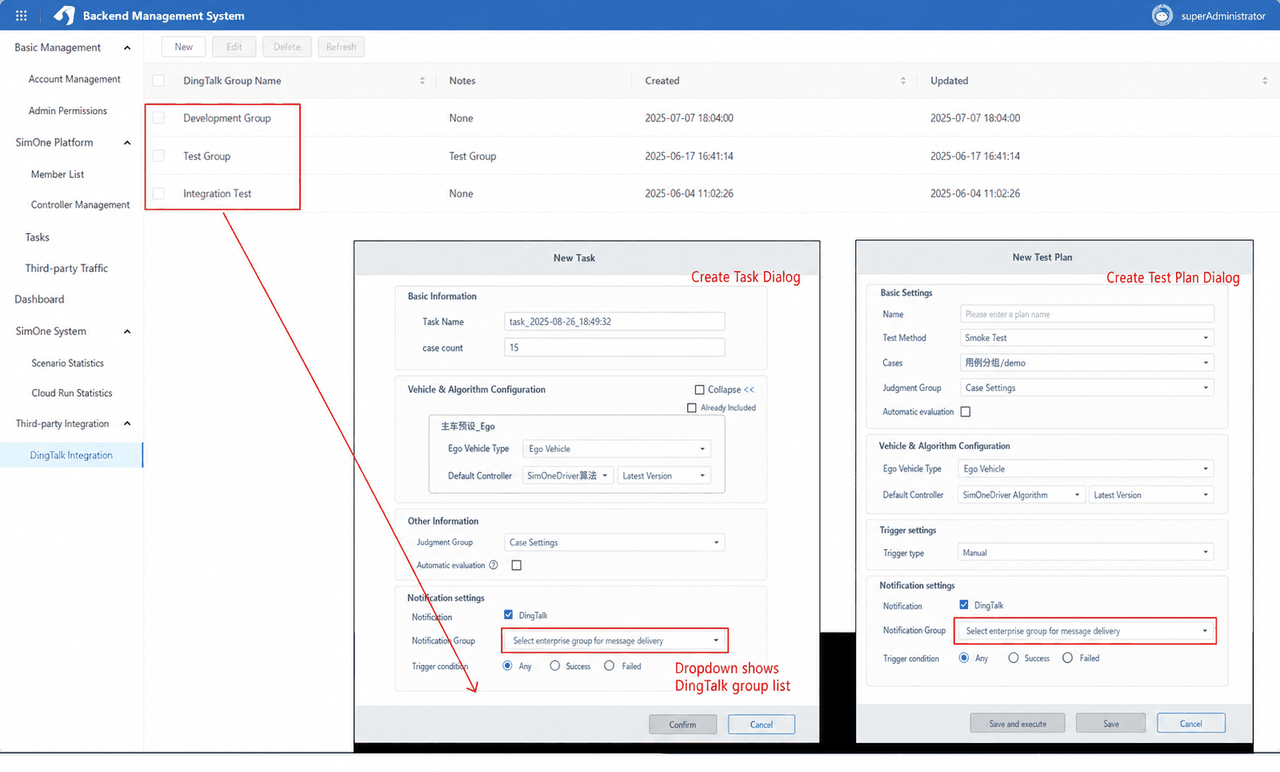
In the Admin System, users can configure and manage DingTalk notification group lists in the Third-Party Integrations module. Multiple DingTalk group Webhook bots can be added to the notification list as needed, and when creating tasks or test plans, specific groups can be designated to receive result notifications.
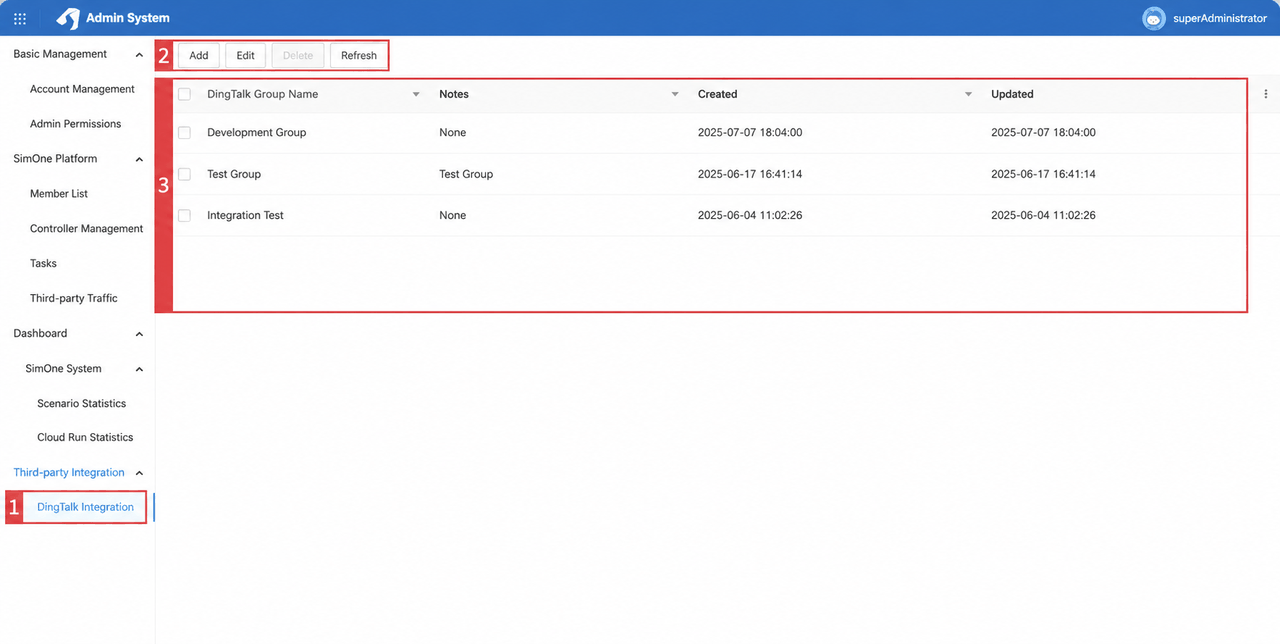
| ID | Feature | Description |
|---|---|---|
| 1 | DingTalk Integration | Click the button to open the DingTalk Integration management page. |
| 2 | Operations | Supports creating, editing, and deleting DingTalk group notification entries. Click Refresh to reload the list. |
| 3 | DingTalk Group List | Displays the current DingTalk group list, including group name, notes, creation time, and update time. |
5.1.1 Create / Edit DingTalk Group
In the DingTalk Integration management module, click the New or Edit button at the top to open the DingTalk group management dialog.
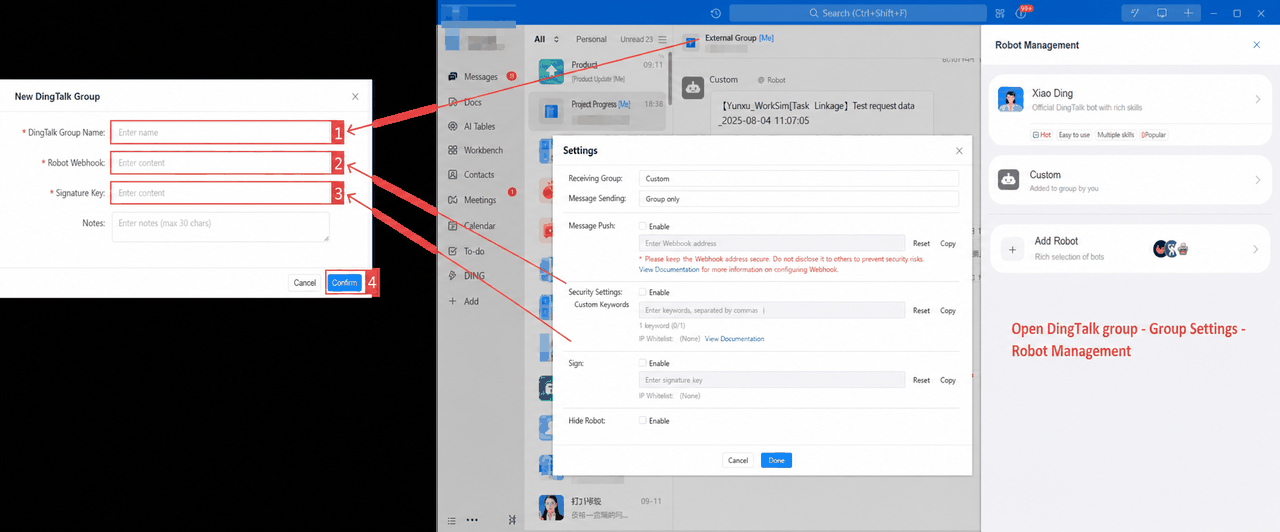
- Group Name: Supports a custom name; it is recommended to use the actual DingTalk group name.
- Webhook URL: Enter the message push Webhook URL of the custom bot added to the DingTalk group.
- Signing Secret: Enter the signing secret from the security settings of the custom bot added to the DingTalk group.
- Click OK to save the configuration and return to the DingTalk group list page.
5.1.2 How DingTalk Groups Are Used
In the DingTalk Integration module of the Admin System, administrators can add and maintain DingTalk notification group lists centrally, ensuring centralized and controllable notification channels.
When running use cases or creating test plans, the system allows users to select from the maintained DingTalk group list in the result notification settings, and flexibly designate target groups to receive notifications based on task type or collaboration needs — enabling precise, efficient delivery of execution results.