User-Defined Variables
1. Overview
1.1 Introduction
Supports triggering corresponding behavior planning for traffic elements in a simulation scenario via API, enabling complex or custom condition logic not covered by OpenSCENARIO and extending scene logic flexibility.
1.2 Applicable Scope
Traffic elements: Ego Vehicle presets, dynamic elements, static elements.
2. Usage Example
First, preset one or more variables in the case (e.g., TruckController0, TruckController1) to control the corresponding traffic elements.
Then set the value of the corresponding variable via API (e.g., set TruckController0 to Drive0.1 or Drive10) to trigger preset actions in the case (e.g., speed action). The speed action controls the speed change process through a travel distance parameter. By using two speed actions — first accelerating then decelerating — the combined travel distance equals the intended movement distance, achieving the goal of reaching a specified displacement.
2.1 Behavior Definition
2.1.1 Add Traffic Element
Go to Dynamic Elements → Commercial Vehicles and drag White Truck 01 into the 2D preview panel.
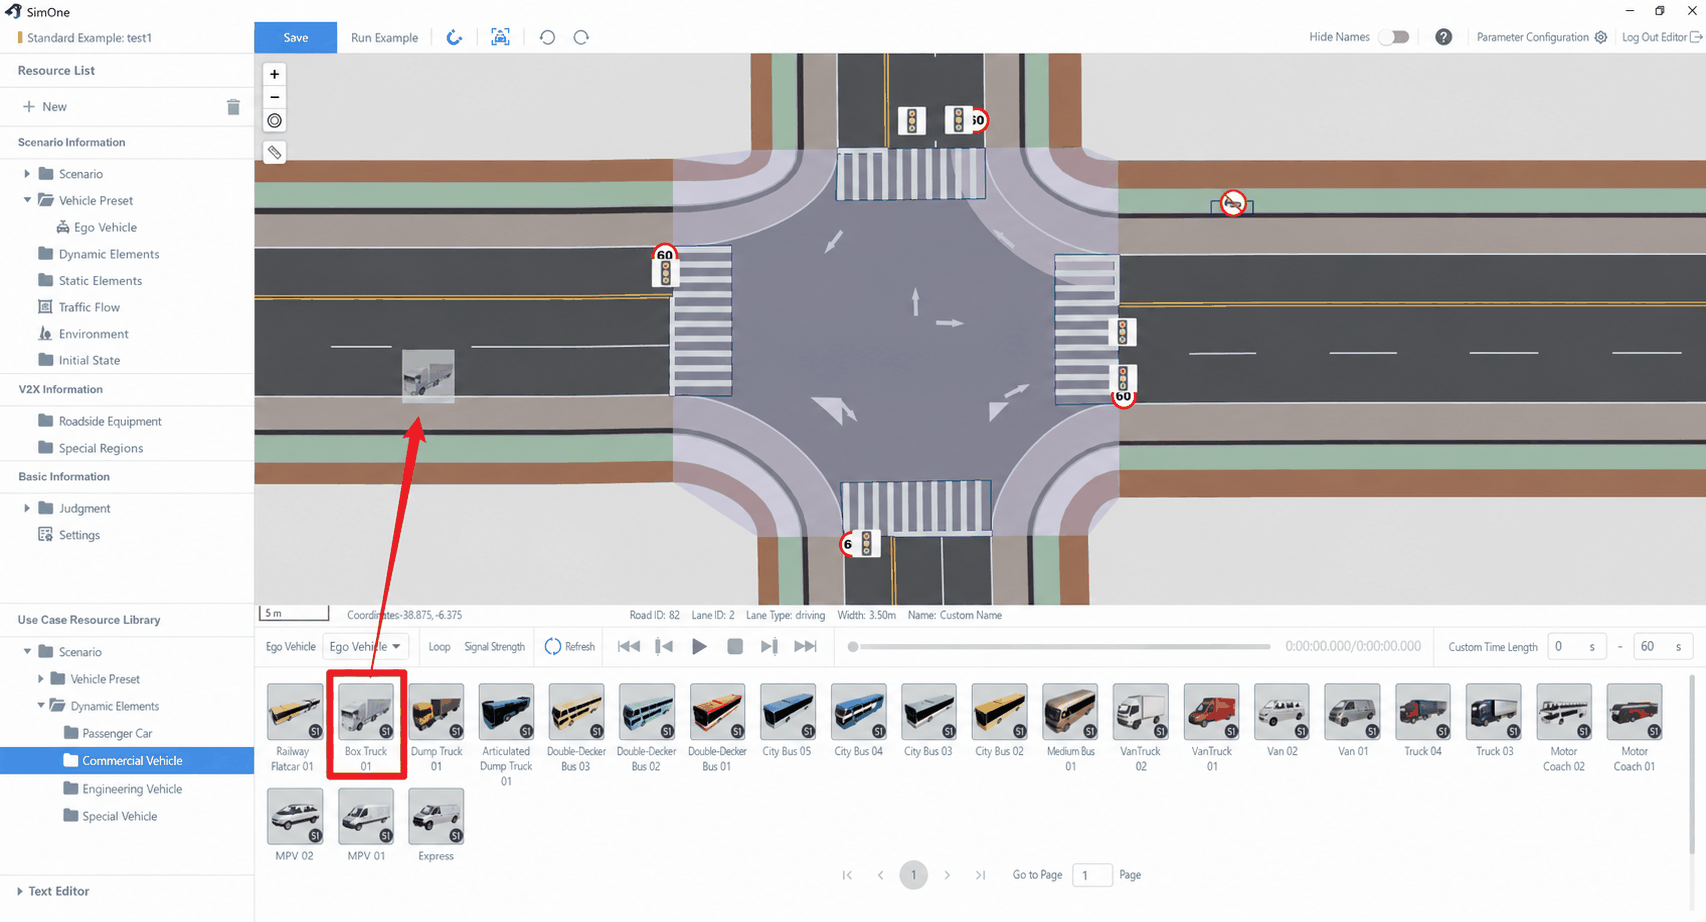
2.1.2 Add Behavior Planning
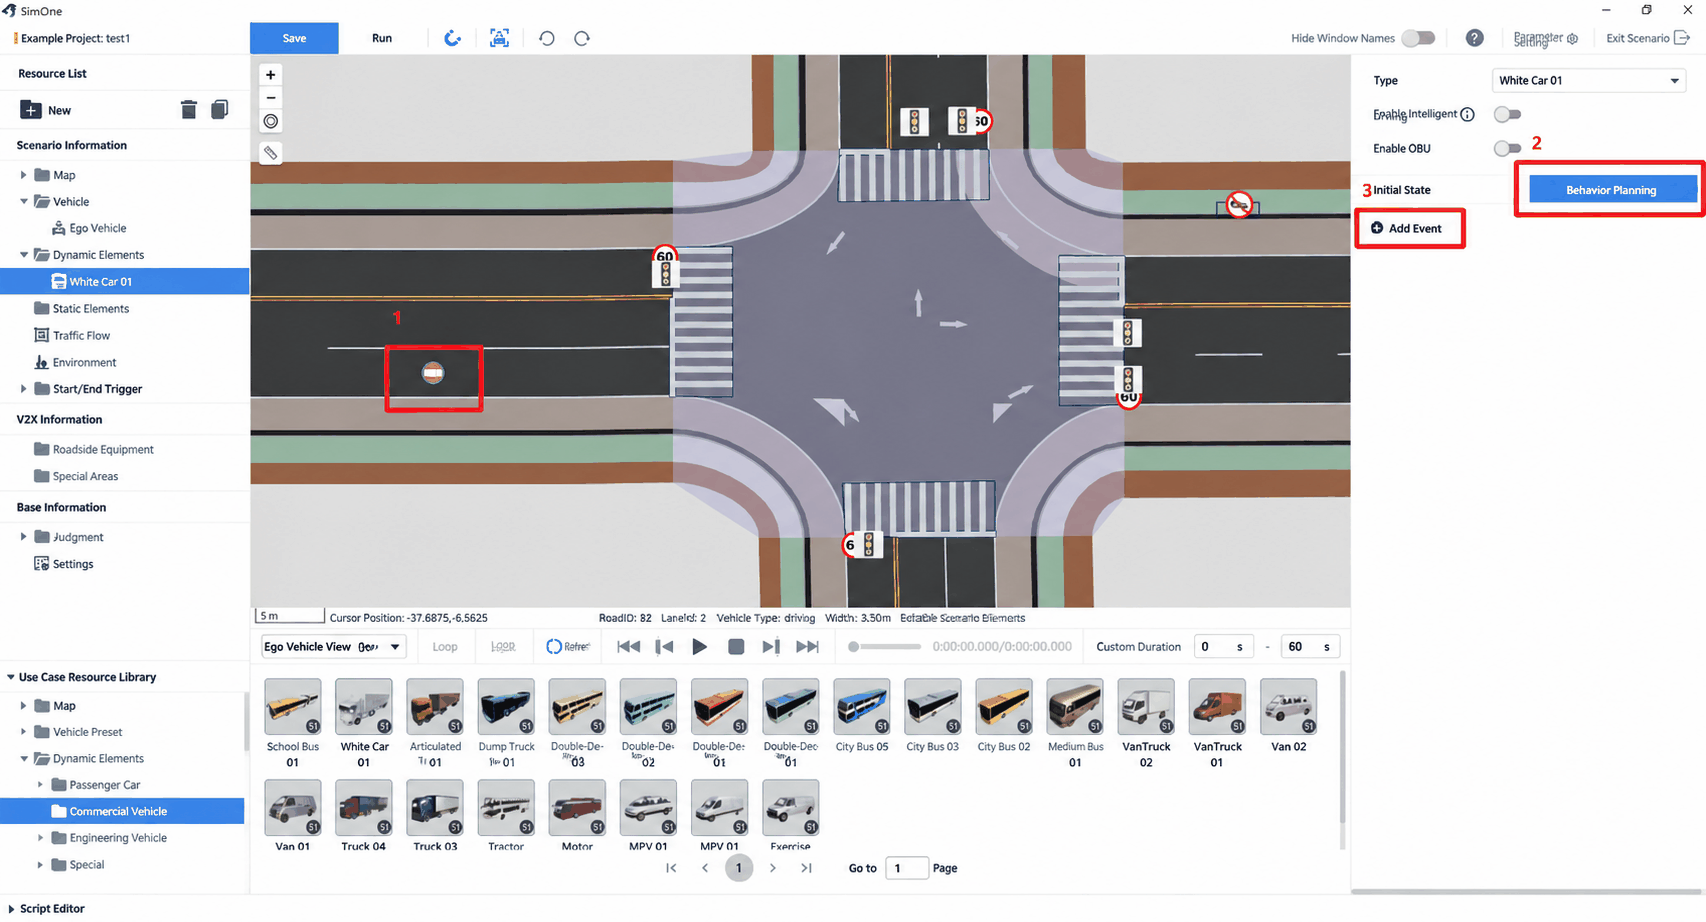
Select White Truck 01, switch to Behavior Planning, and click Add Event.
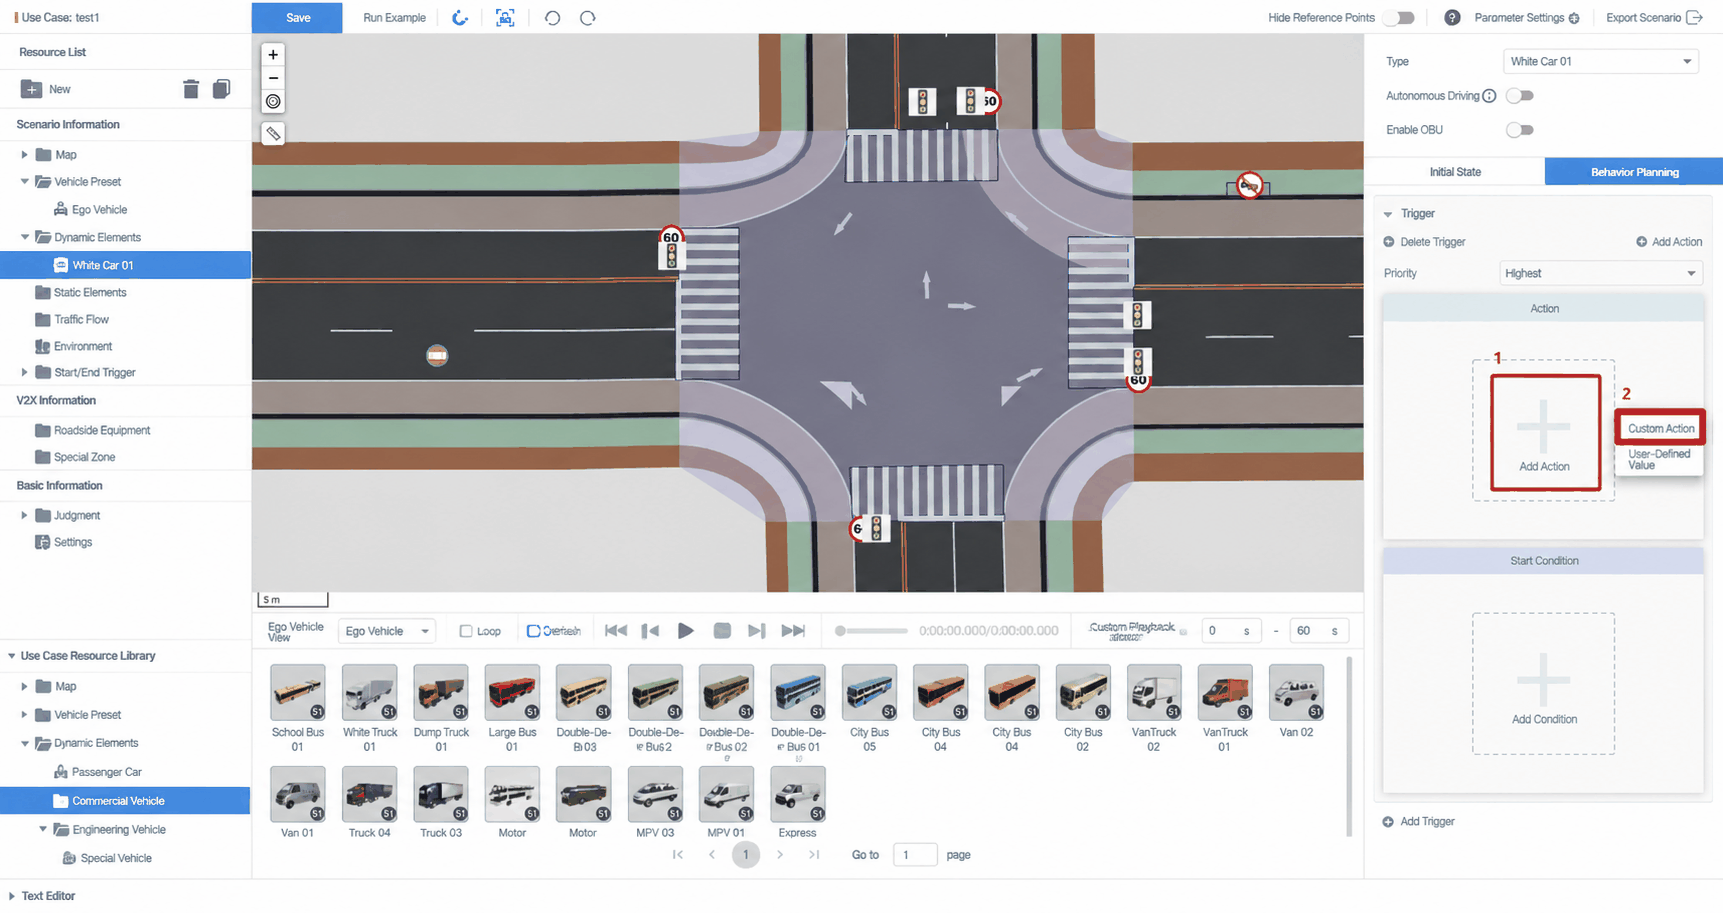
Click Add Action and select Private Action.
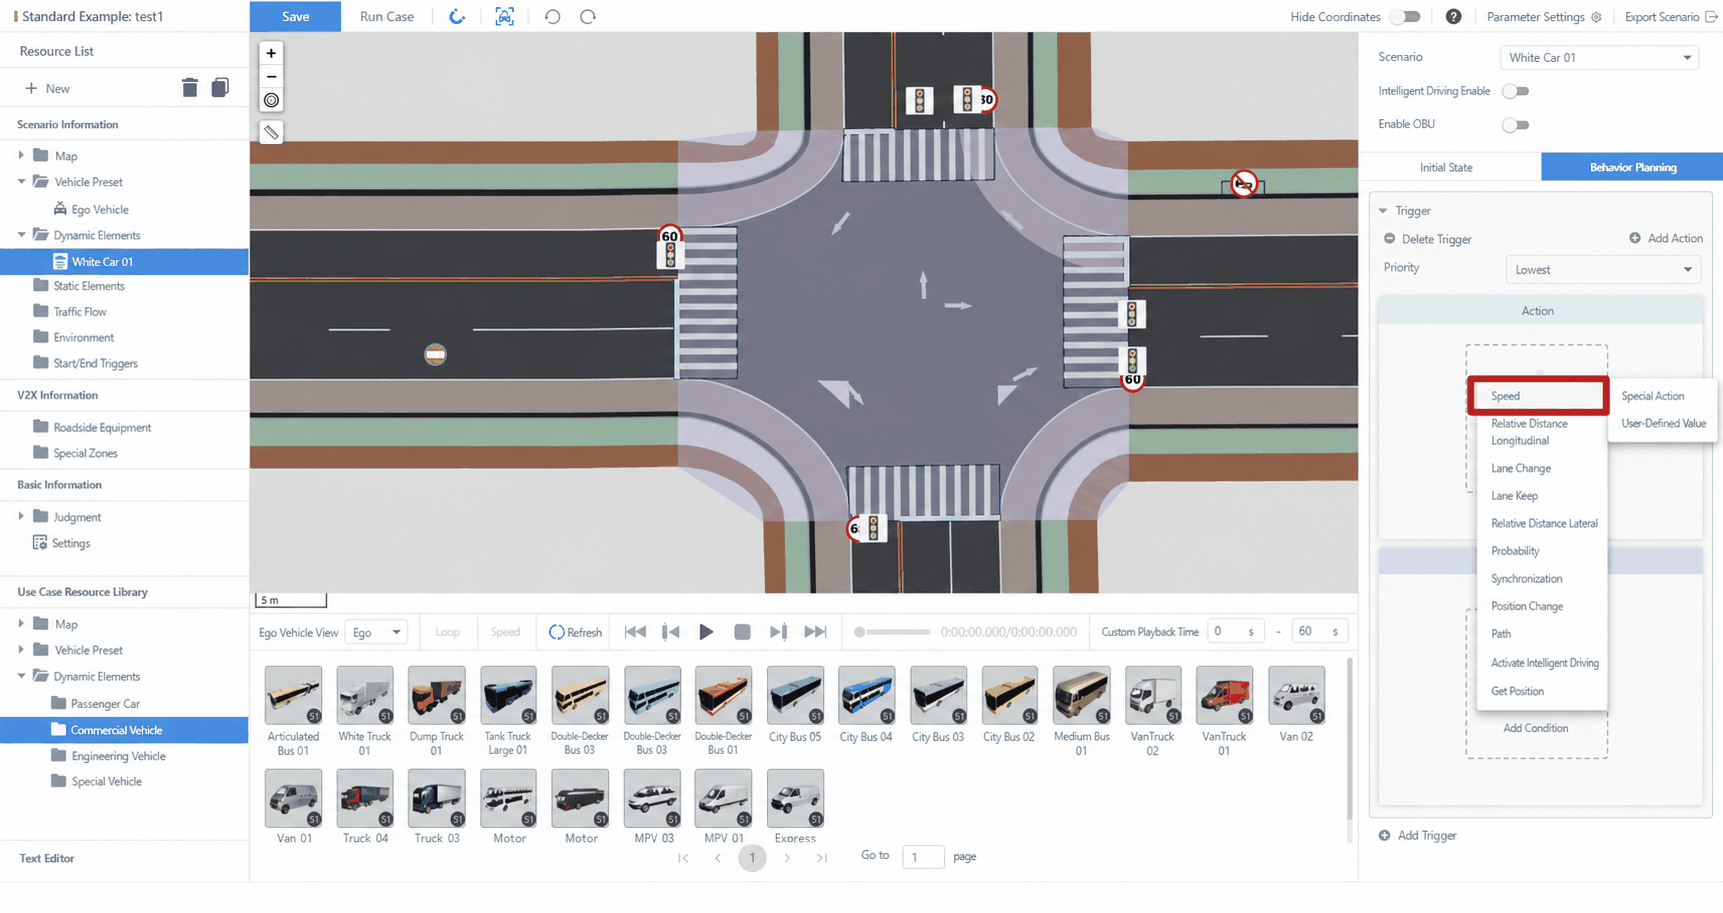
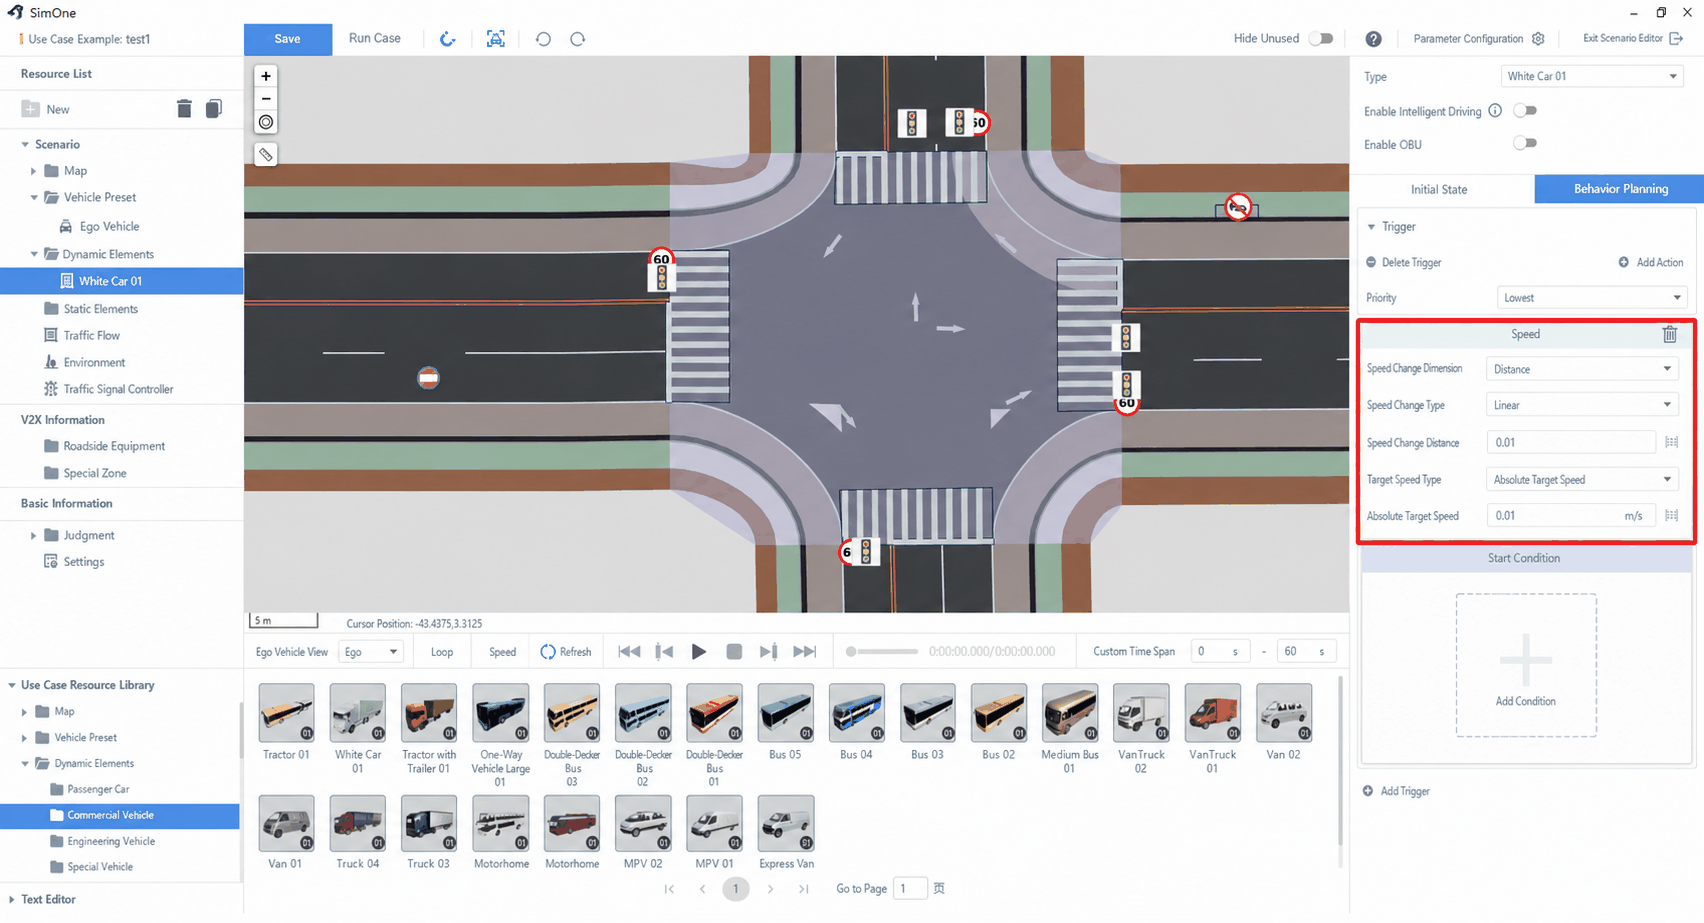
Select Speed.
Configure the action parameters: set the Change Dimension to "Distance" so the travel distance can be controlled; the Change Shape is flexible — "Linear" is recommended for easier target speed calculation. Set the required travel distance (e.g., 0.01 m). The absolute target speed is determined by the acceleration time and acceleration value — in the example it is set to 0.01 m/s, giving a travel time of 1 s and an acceleration of 1.
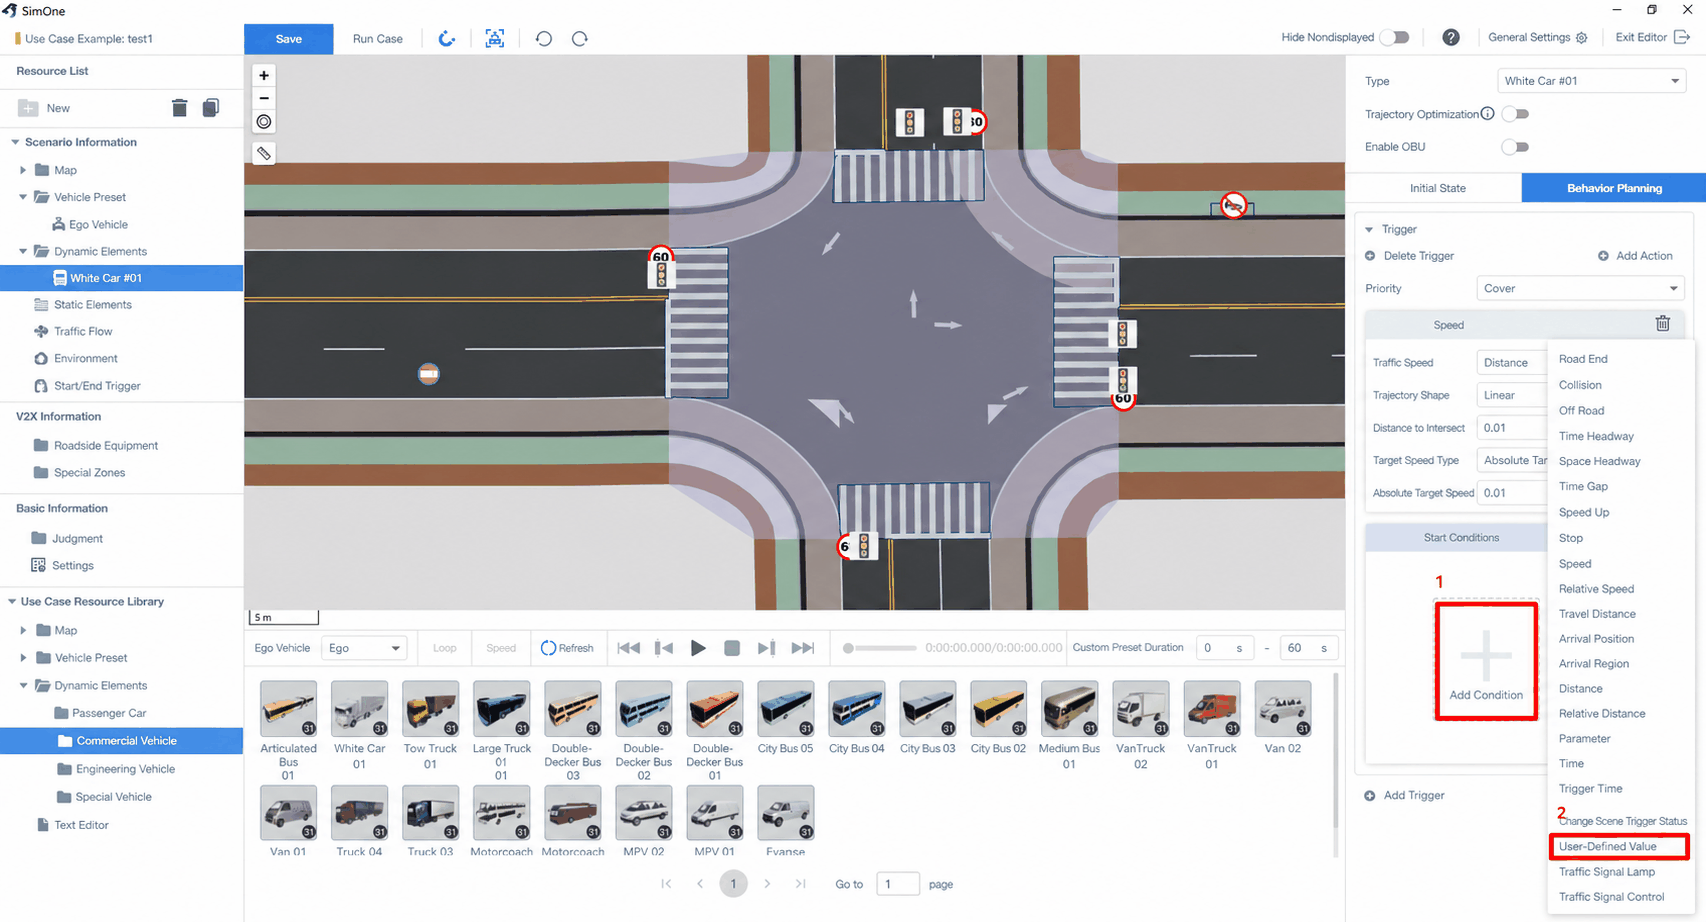
Set the trigger condition: click Add Condition and select User-Defined Value.
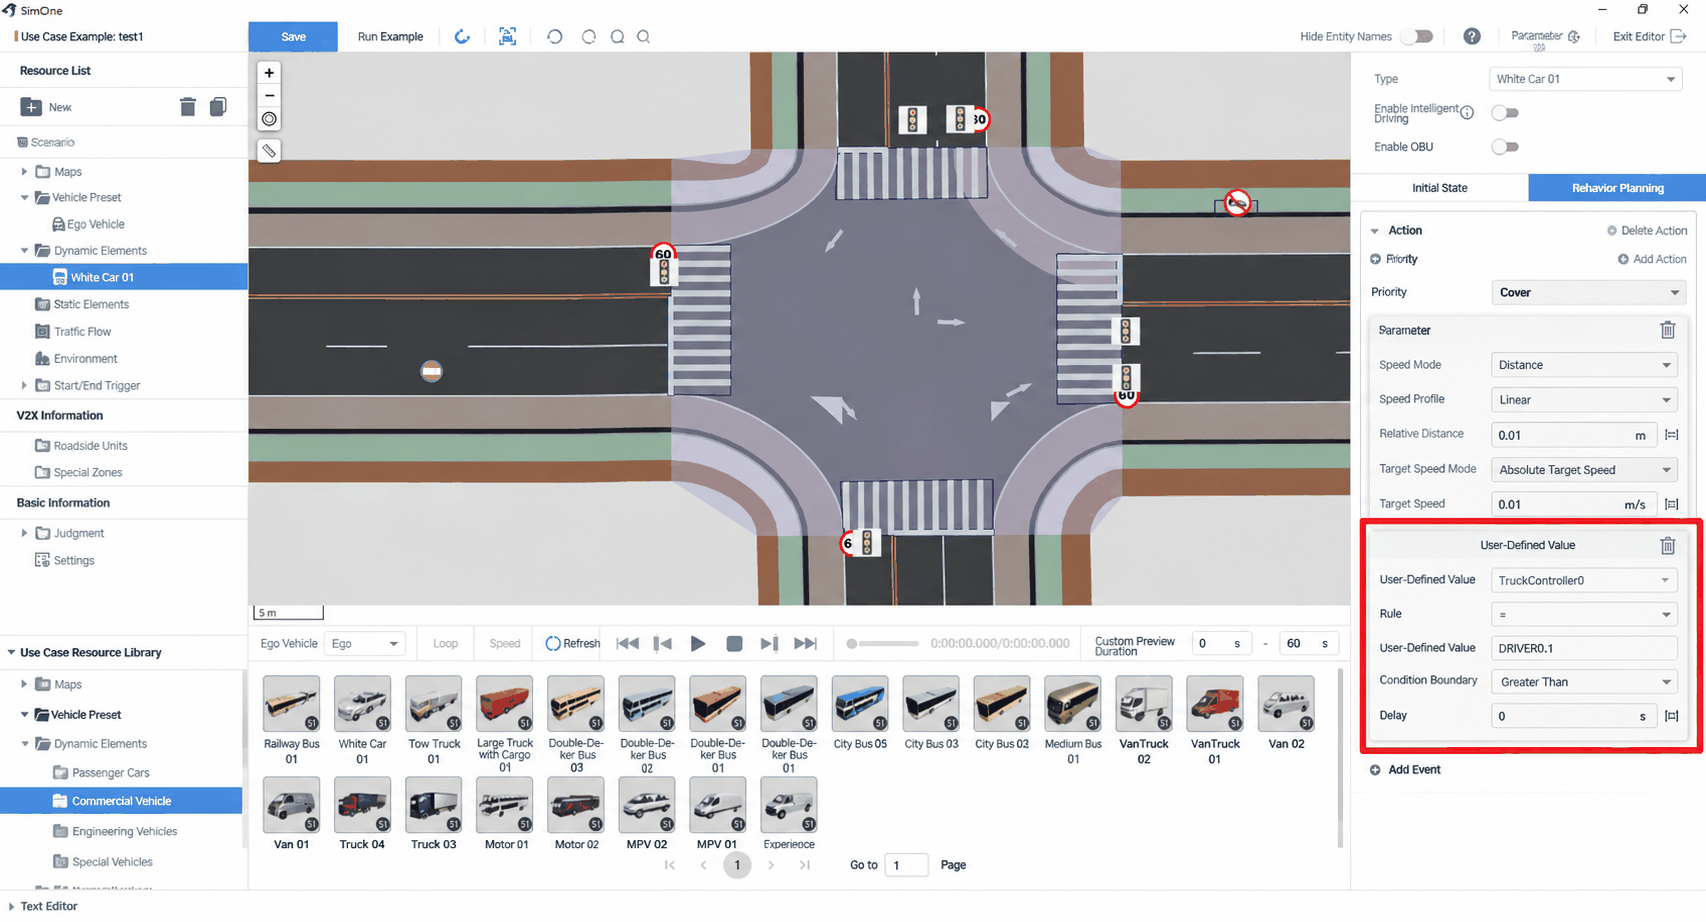
The first user-defined value is the name; the second is the value. Both will be matched via API. Key points to note: the rule should be "=" and the condition edge should be "Rising" — this ensures the action is triggered only once per call.
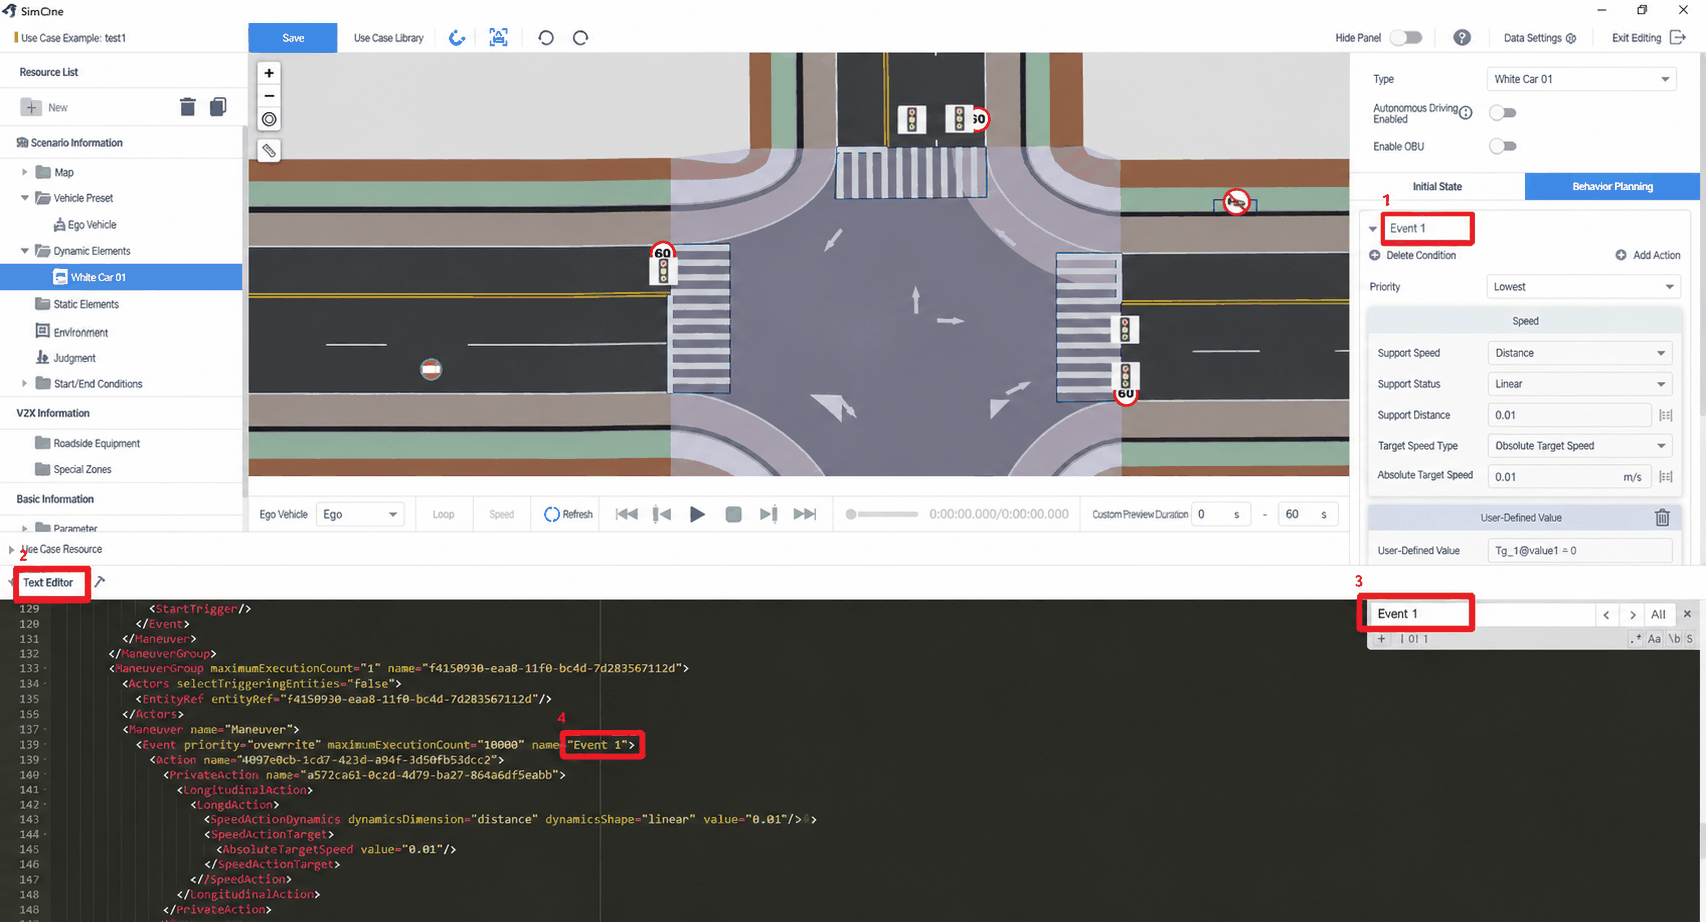
By default, an event can only execute once. If triggered again via API, it will not execute again. To allow multiple executions, open the Text Editor and set the maximum execution count.
Adjustment steps: 1. Rename the event; 2. Open the Text Editor; 3. Press Ctrl+F to search for the event; 4. Adjust maximumExecutionCount.
Save and run the case, then trigger Event 1 to start execution via an API call.
2.2 API Calls
Calling the API from Linux using the C/C++ interface.
Control interface for truck controller: SCENARIO_API bool SetUserDefinedValueCondition(char* name, char* value)
This depends on the SimOneTransAPI dynamic library. On Linux, the library is located at: SimOneAPI\lib\Linux64\libSimOneTransAPI.so. The header file is at: SimOneAPI\include\SimOneScenarioTransAPI.h. This library has several dependencies — refer to: SimOneAPI\SimOneTrans\CMakeLists.txt.
A sample project is provided under SimOneTrans in SimOneAPI. This interface can be called independently without relying on SimOneAPI in a standalone project.
2.2.1 Trigger Event Execution
Example of the control interface call:
#include "SimOneScenarioTransAPI.h"
#include<thread>
int main(int argc, char* argv[])
{
    while (1)
    {
        auto in = getchar();
        if (in == '1')
        {
            SimOneAPI::SetUserDefinedValueCondition("TruckController0", "DRIVE0.1");
        }
        std::this_thread::sleep_for(std::chrono::milliseconds(100));
    }
    return 0;
}
You can extend this example by handling different inputs to send different values, thereby triggering different actions in the case.
2.2.2 Get Event Status
Use SetScenarioEventCB to register a callback function. When a user-defined event is sent, the registered callback will be executed to receive the custom command.
#include "SimOneServiceAPI.h"
#include "SimOnePNCAPI.h"

void handleScenarioEvent(const char* source, const char* target, const char* type, const char* content) {
        std::cout << "event " << content << std::endl;
}

int main(int argc, char* argv[])
{
        bool isJoinTimeLoop = false;
        const char* MainVehicleId = "0";
        SimOneAPI::InitSimOneAPI(MainVehicleId, isJoinTimeLoop, "127.0.0.1");

        SimOneAPI::SetScenarioEventCB(handleScenarioEvent);
        while (1)
        {
            std::this_thread::sleep_for(std::chrono::milliseconds(100));
        }
        return 0;
}