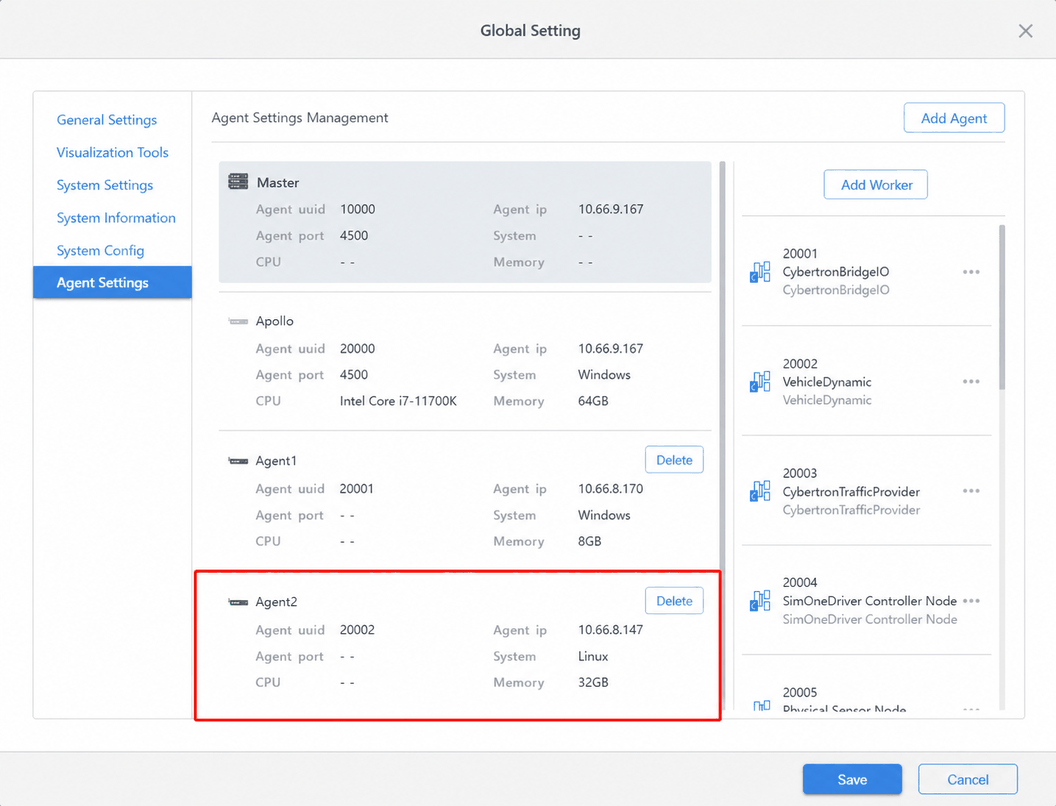
Distributed System
A distributed system configuration includes both the Master and the Agent (slave). Both can run on Windows or Linux. The entire distributed architecture supports only one Master; the number of Agents is unlimited.
Windows
1. Distributed System Installation
The installer supports distributed installation, making it easy to deploy Ego Vehicle nodes and sensor simulation nodes on different machines for co-simulation.
1.1 Master Configuration
For Master installation, refer to the Product Installation guide.
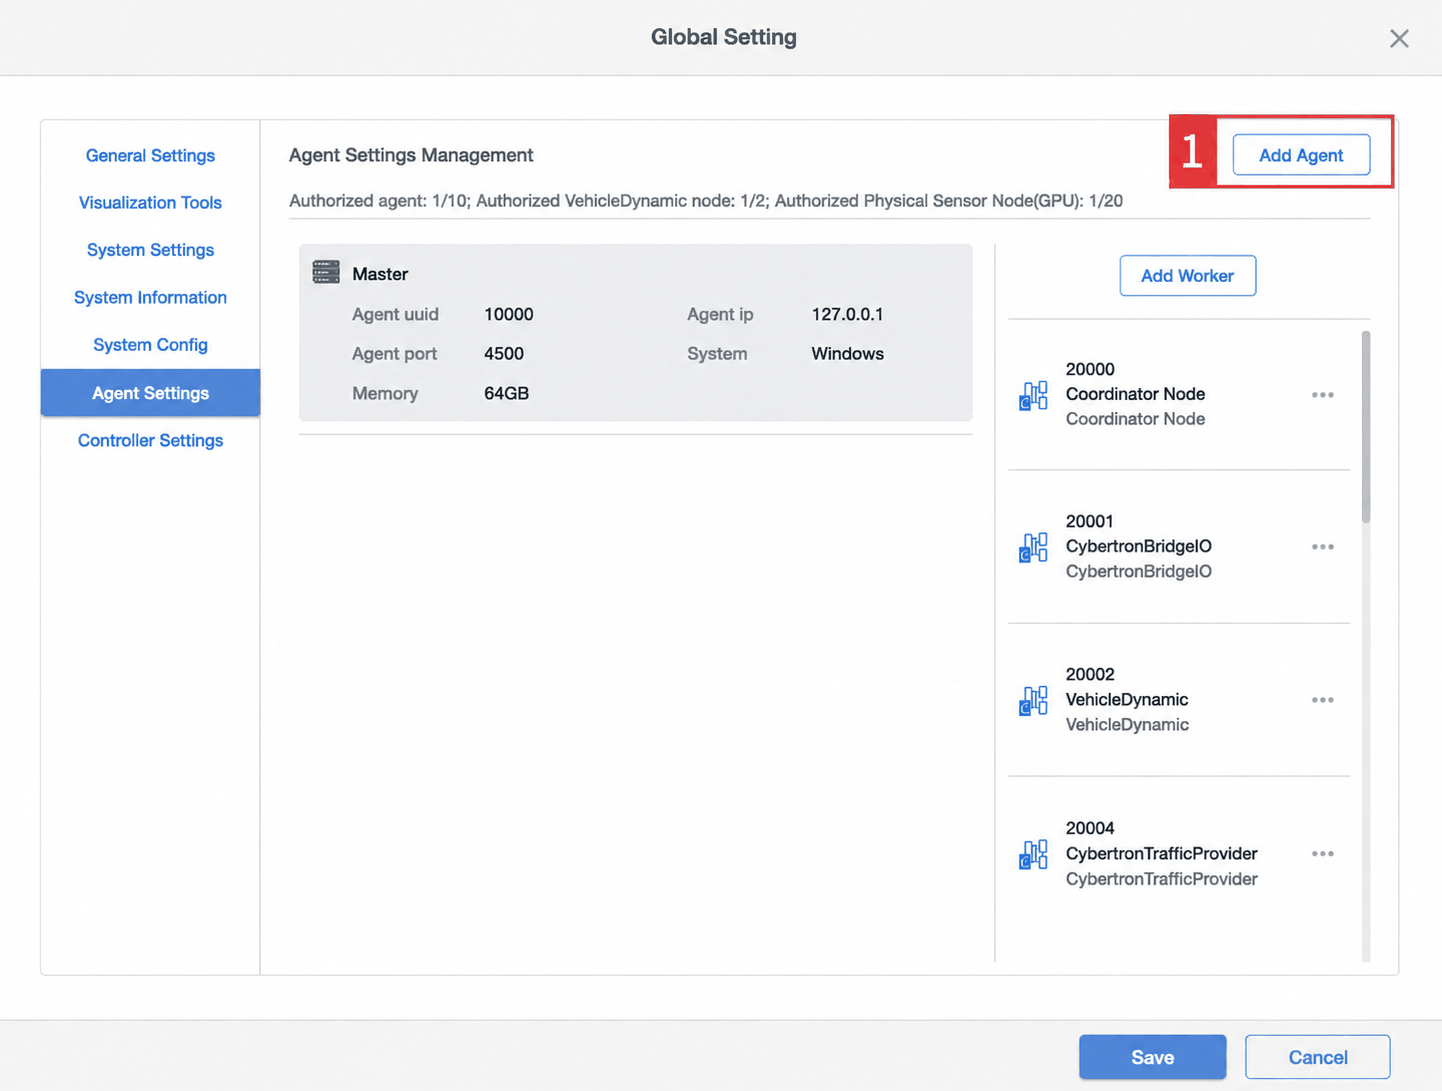
(1) After installing the Master, click the Settings button in the upper-right corner to open Global Settings.

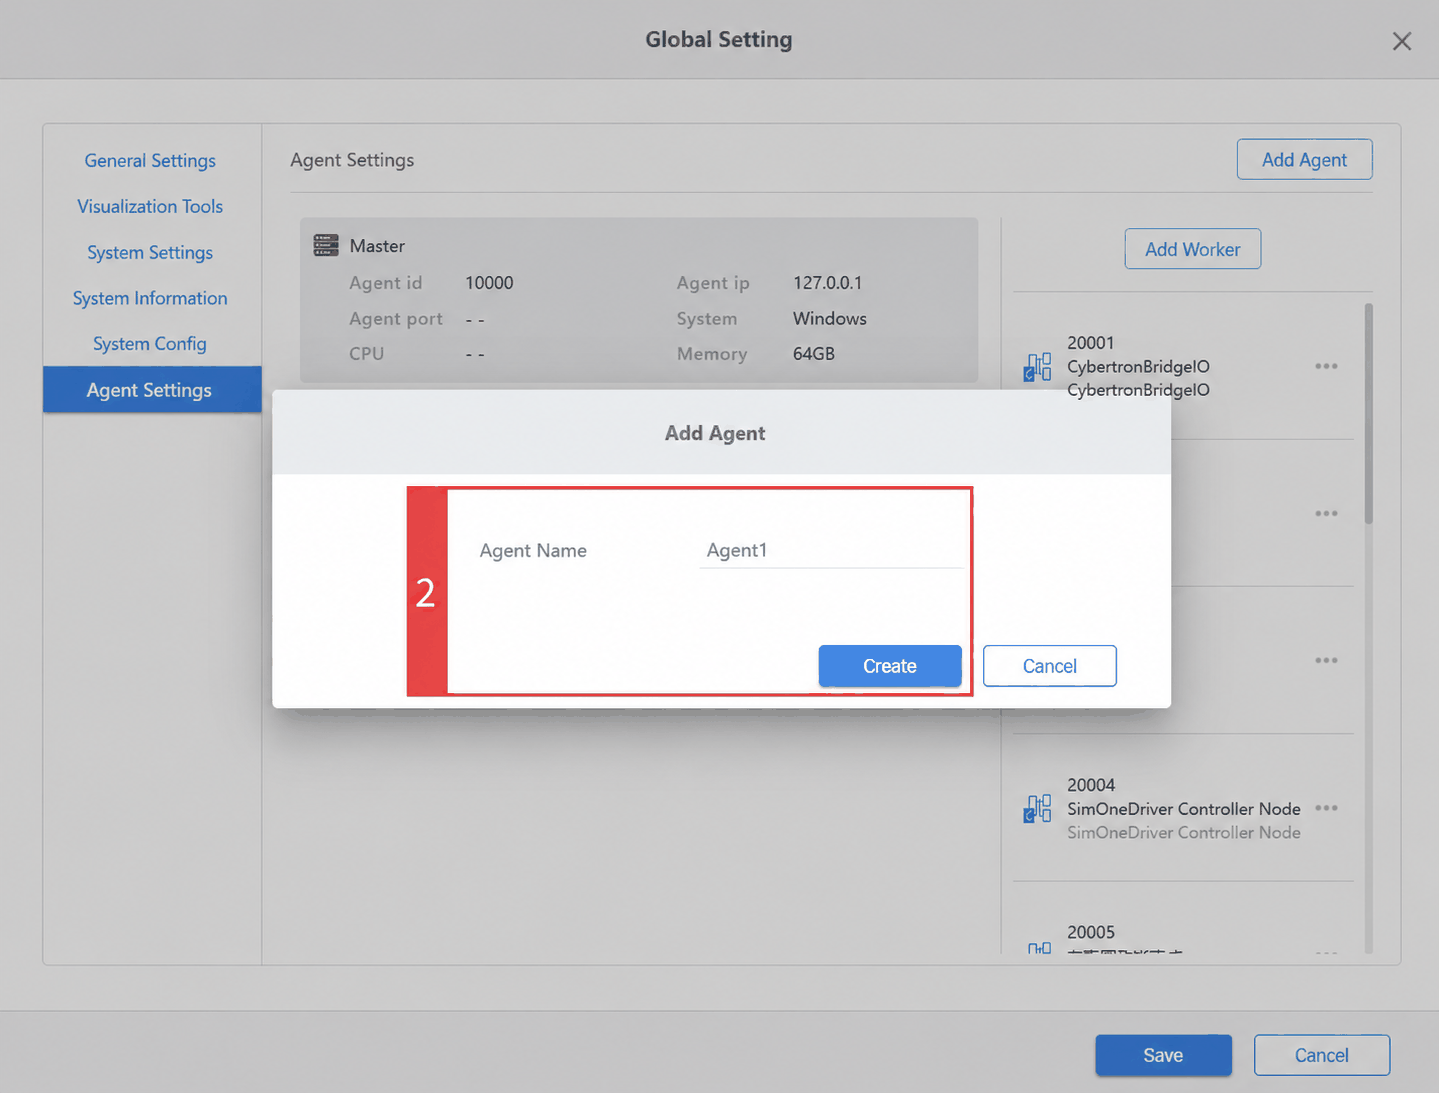
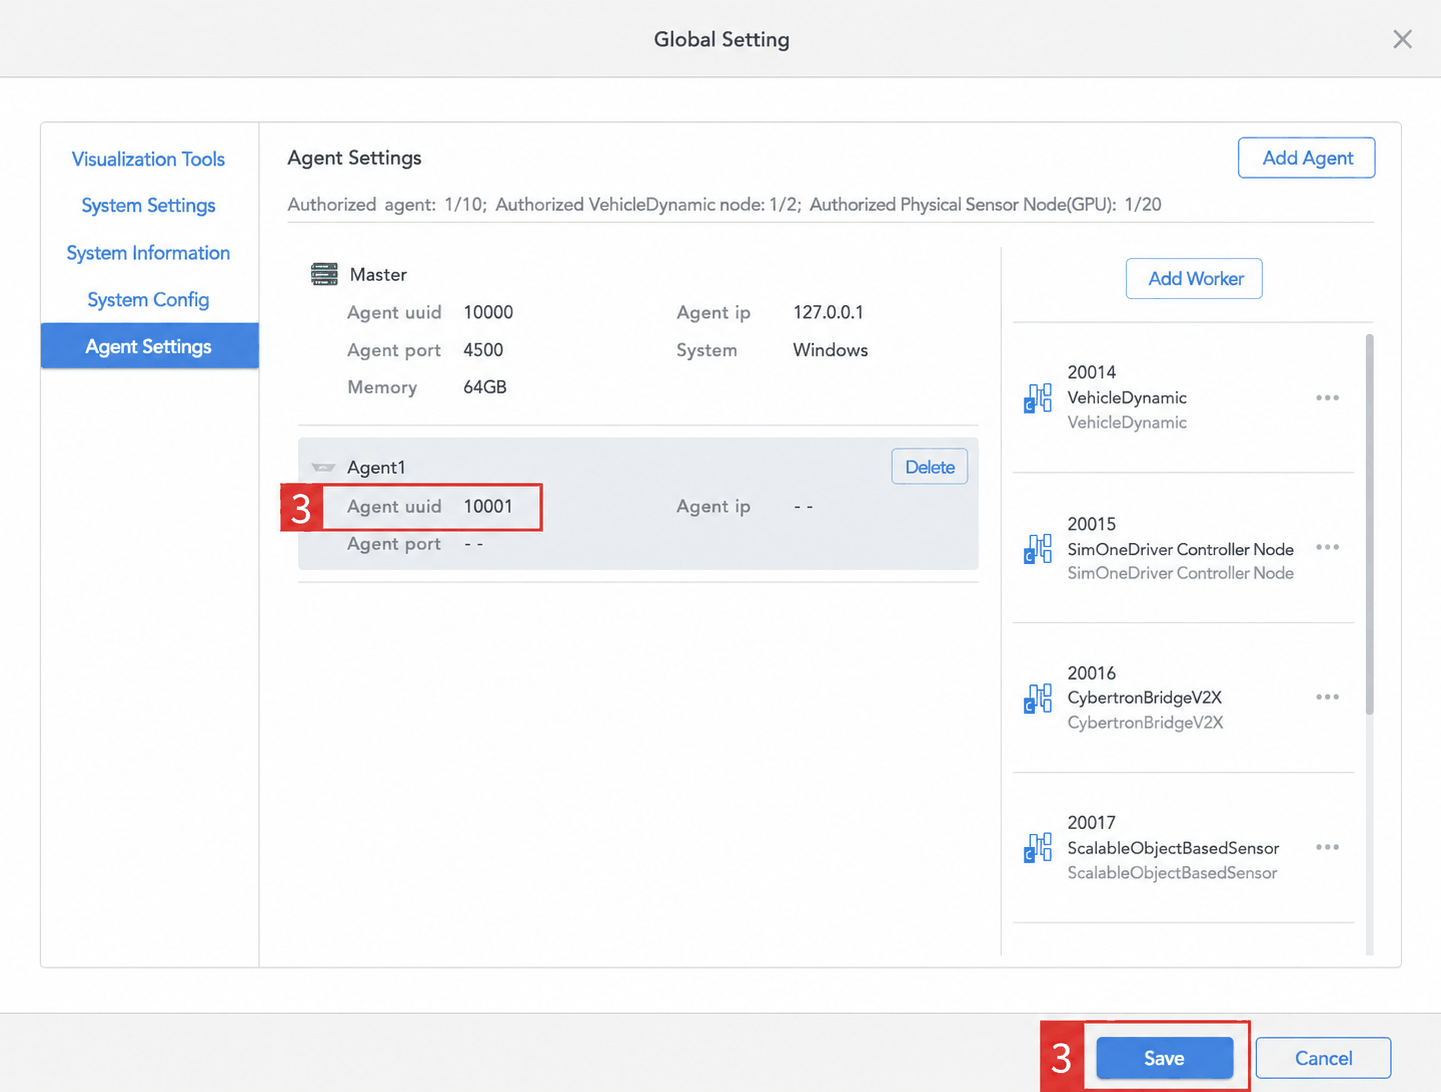
(2) In the Agent List, click the Add Agent button to add an Agent. The Agent UUID shown in the list can be used as the authorization code when installing the Agent (e.g., 10001).
For related UI descriptions, refer to Distributed System Overview.
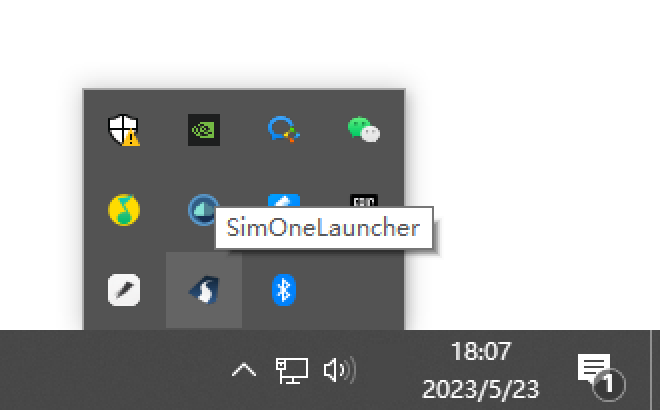
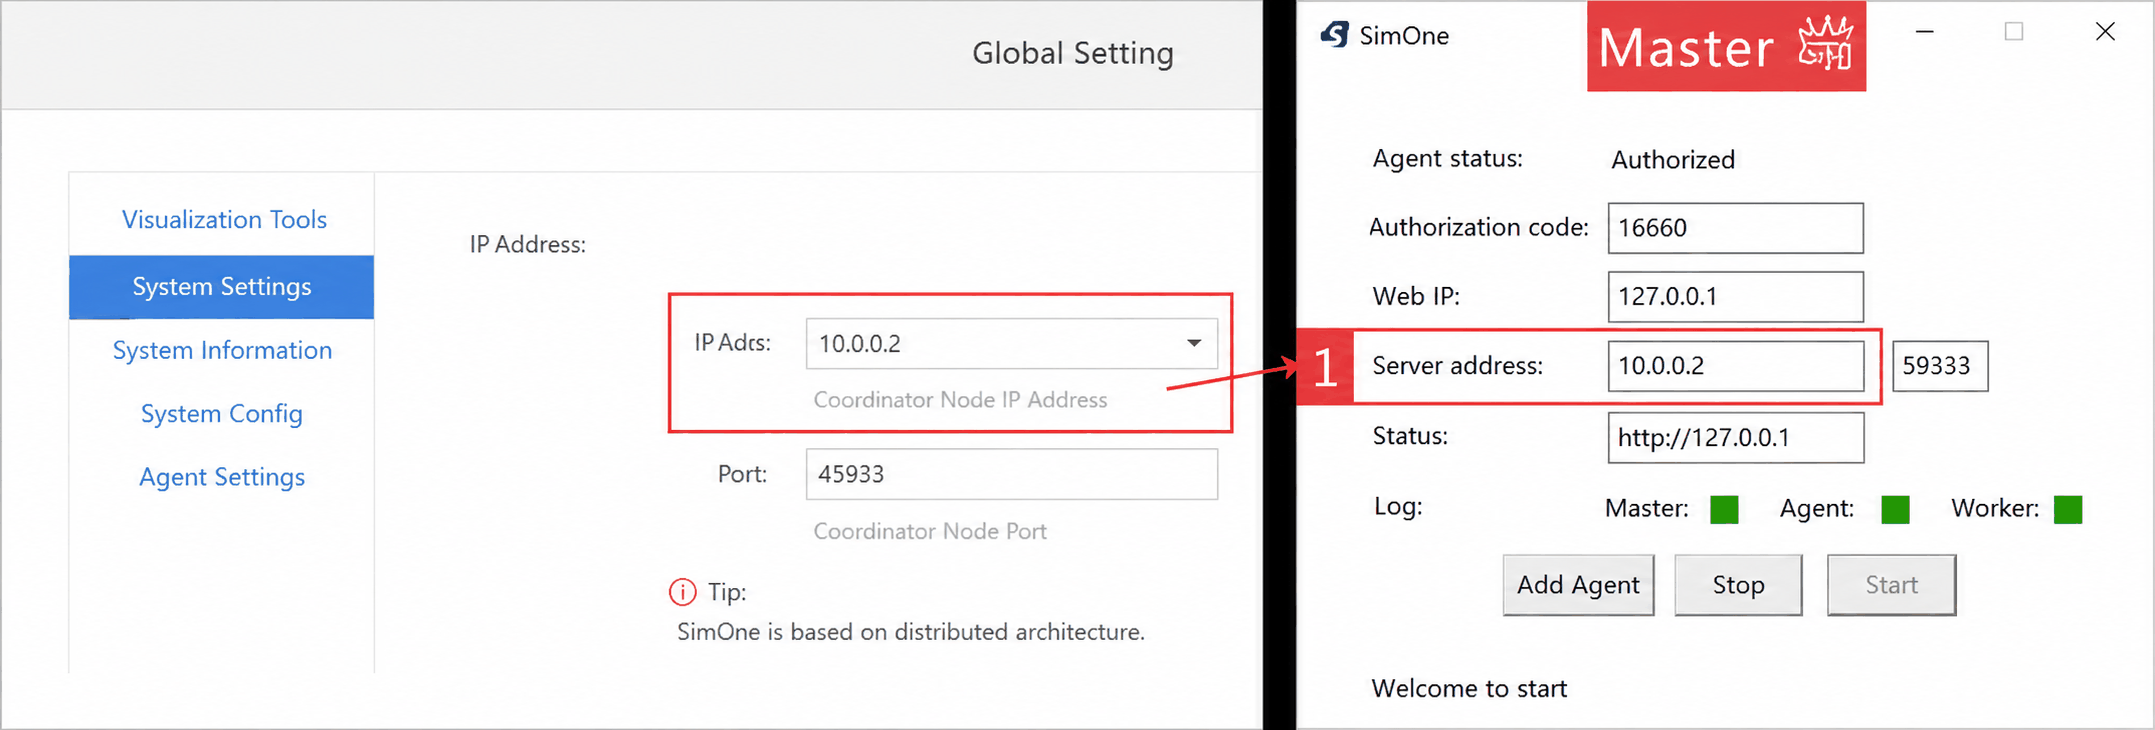
(3) Open the SimOneLauncher system tray and change the default Web address (127.0.0.1) to the IP address shown in SimOne under Global Settings > System Settings. Complete this step before starting the service, otherwise the software may fail to connect.
1.2 Agent Installation
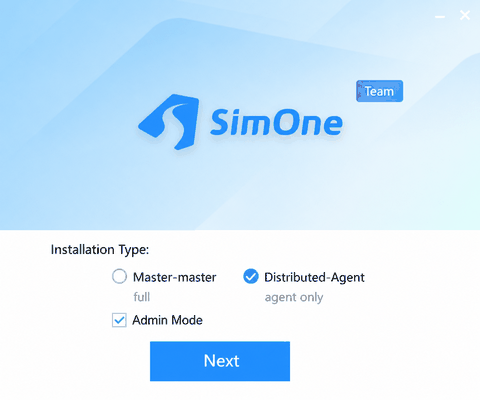
(1) Copy the installer to the Agent machine and run it. Select Distributed — Agent as the installation type.
The Agent and Master use the same installer. Simply select Distributed — Agent during installation.
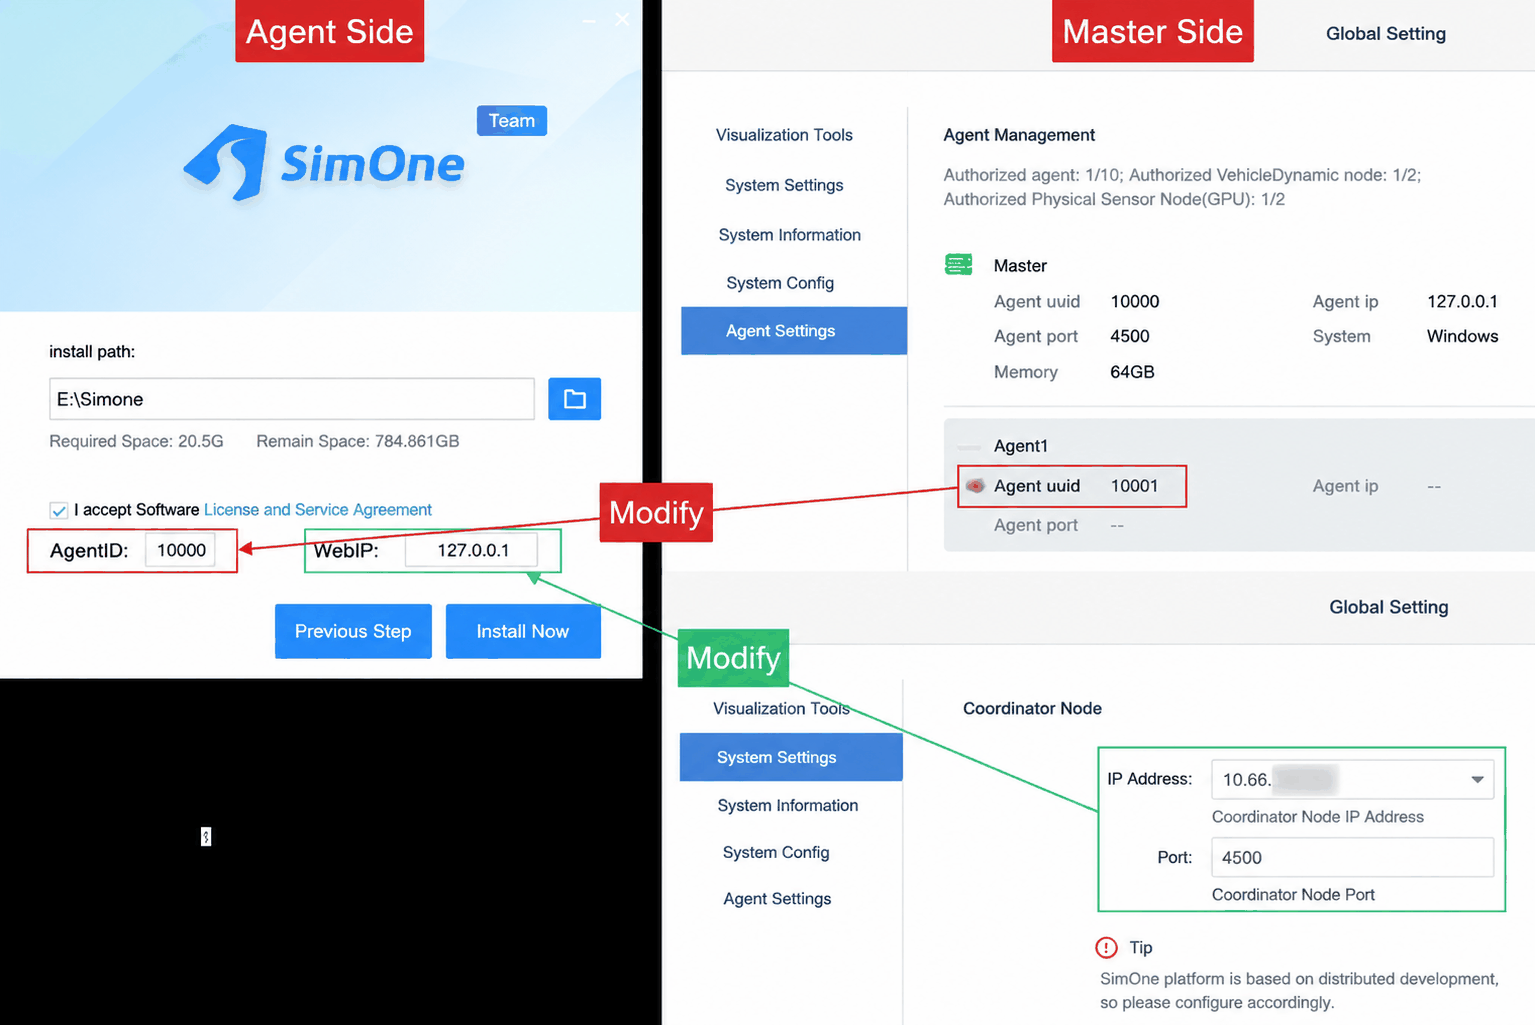
(2) During installation, enter the Agent ID and Web IP, accept the license agreement, and specify the installation path to bind the Agent to the Master.
Agent ID is the ID number shown in the Master's Agent List.
Web IP is the IP address of the Master.
If you cannot confirm the Agent ID and Web IP at this time, you can fill them in later via the Agent tray.
(3) After installation, the Agent automatically detects and connects to the Master.
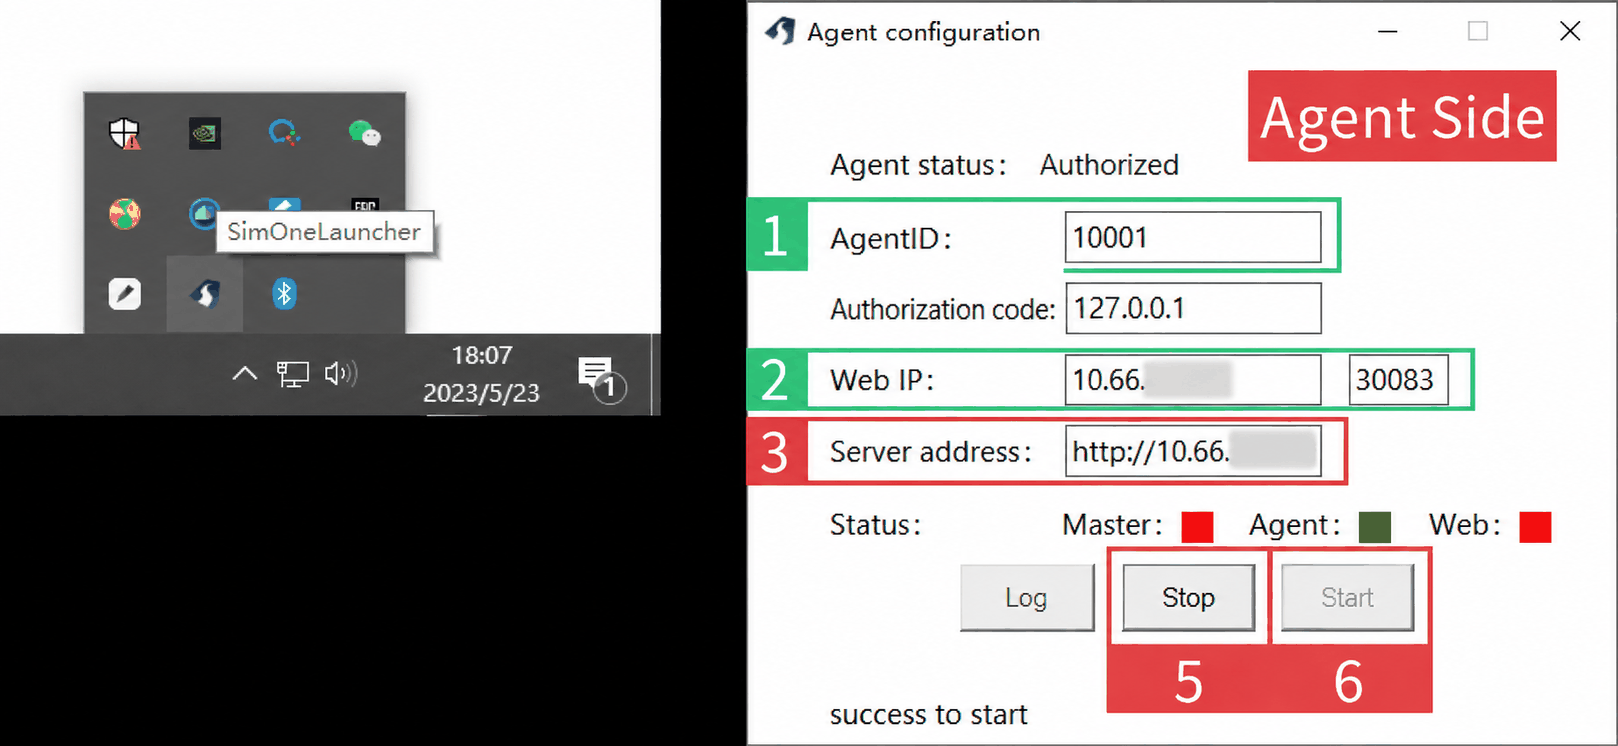
(4) Open the SimOneLauncher system tray to view the Agent ID and Web address entered during installation.
The SimOneLauncher system tray supports management and monitoring of distributed simulation nodes. For UI descriptions, refer to Distributed System Overview.
If the Master was not bound during installation, you can update the Agent ID and Web address here. Click Stop and then Start on both the Master and Agent trays to update the binding status.
(6) Change the default server address to your own server address.
After installation, you must bind your own server address to use the software normally.
(7) Click Stop and then Start to restart SimOne.
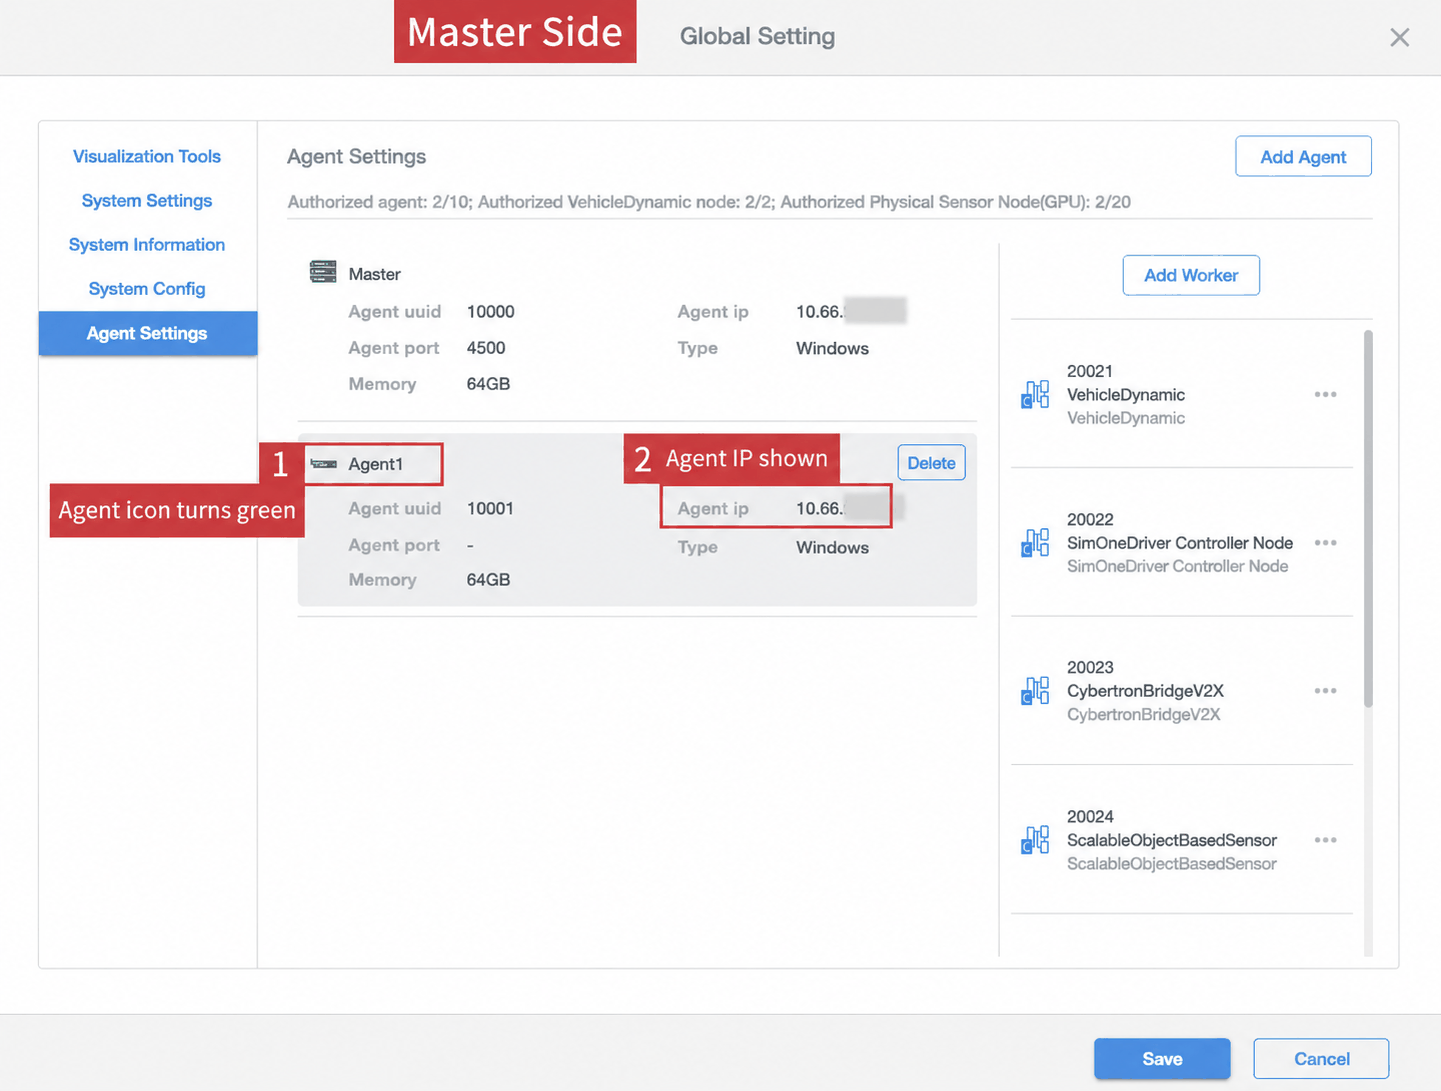
(8) Verify the Agent binding status in the Master under Global Settings > Agent List. If the Agent icon changes from gray to green, binding is successful.
1.3 Troubleshooting
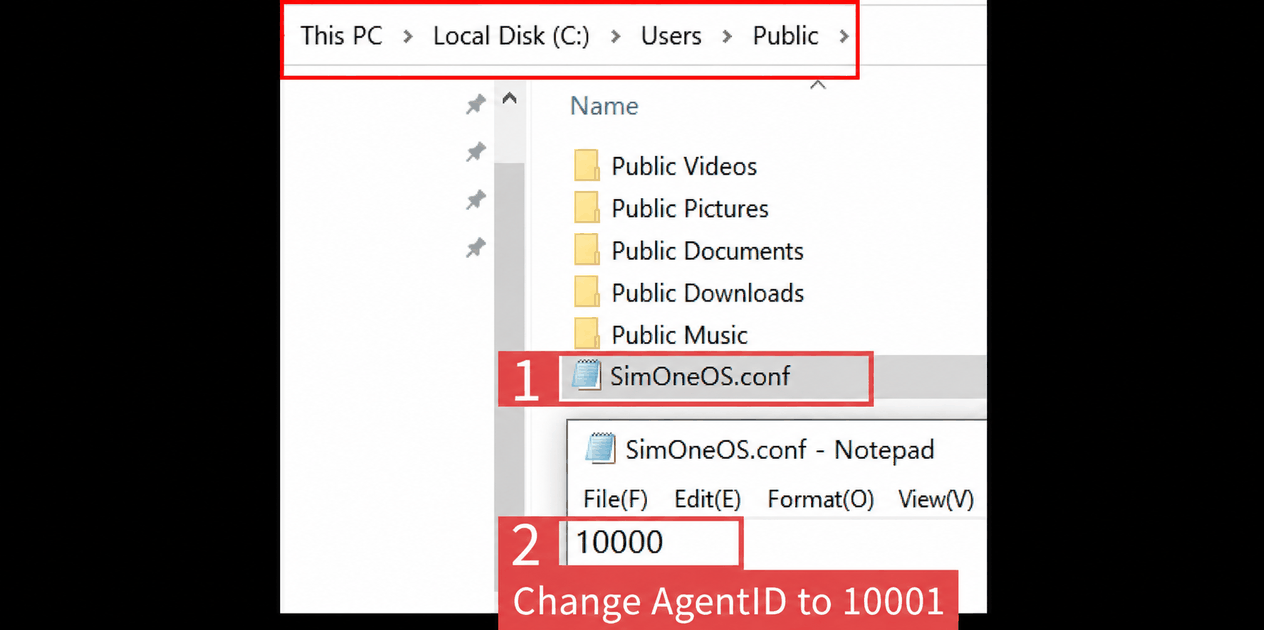
If binding still fails after the steps above, a possible cause is that the Agent machine previously had a Master installation, and leftover data from an incomplete uninstall is interfering. Edit the SimOneOS.conf file in C:/Users/Public on the Agent machine, and change 10000 to the previously generated Agent ID (e.g., 10001).
2. Distributed System Uninstallation
Refer to the Product Uninstallation guide.
Linux
3. Linux Master Configuration
3.1 Install Master SimOne
If Linux is used as the Master, the basic steps are similar to the Windows Master configuration. The main difference is in step 2, since Linux has no system tray.
(1) Run the installation script: sudo bash ./install.sh
(2) Start the SimOne service: sudo bash ./start.sh
Command-line operations (modify configuration inside Docker):
(3) Enter the SimOne Docker container: sudo docker exec -it simone bash
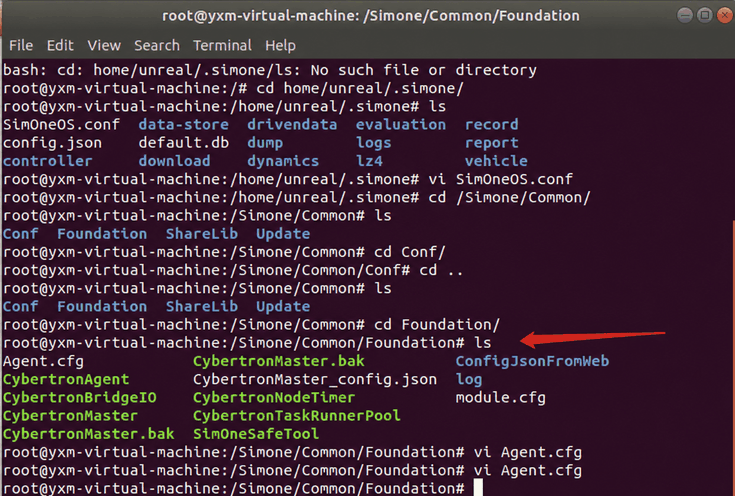
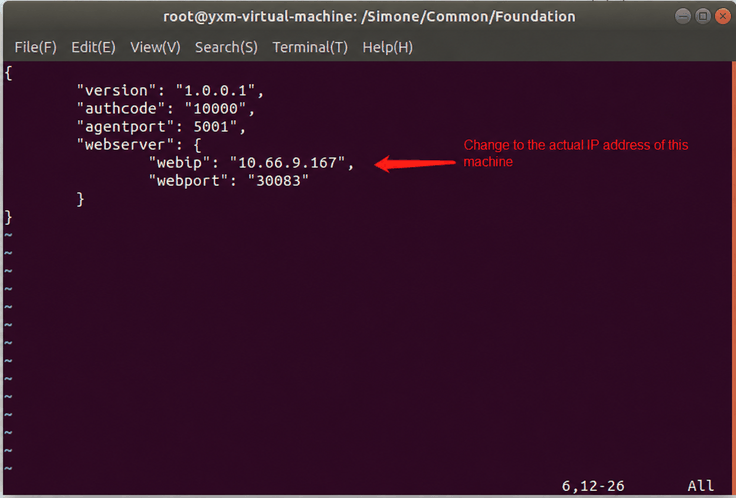
(4) In the /Simone/Common/Foundation directory, edit Agent.cfg and change webip to the Master's actual Linux IP address. Save and exit, then restart SimOne: sudo docker restart simone
Web interface operations:
(5) After installation, open SimOne in a browser, go to Global Settings > System Settings, and change the IP address to the Master's IP.
3.2 Install Master UE
(1) Run the installation script: sudo bash ./install-ue.sh
(2) When prompted for an IP address during installation, enter the Master's IP address.
(3) After installation, start the SimOne-UE service: sudo bash ./start-ue.sh
4. Linux Agent (Slave) Configuration
4.1 Install Agent UE
(1) Run the installation script: sudo bash ./install-ue.sh
(2) When prompted for an IP address during installation, enter the Master's IP address.
(3) After installation, start the SimOne-UE service: sudo bash ./start-ue.sh
(4) Enter the SimOne-UE container: sudo docker exec -it simone-ue bash
(5) Navigate to /SimOne/Common/Foundation and edit Agent.cfg, changing authcode to the UUID of the Agent created on the Master.
(6) Restart the SimOne-UE container: sudo docker restart simone-ue
4.2 Agent Configuration
On Linux, SimOne runs inside Docker, so you need to enter the container to make changes (Linux SimOne installation is not repeated here):
(1) Enter the SimOne Docker container: sudo docker exec -it simone bash
(2) In the /Simone/Common/Foundation directory, edit Agent.cfg.
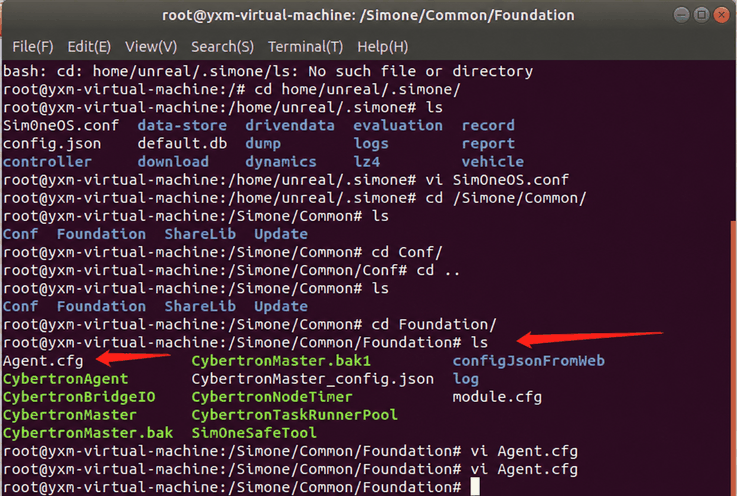
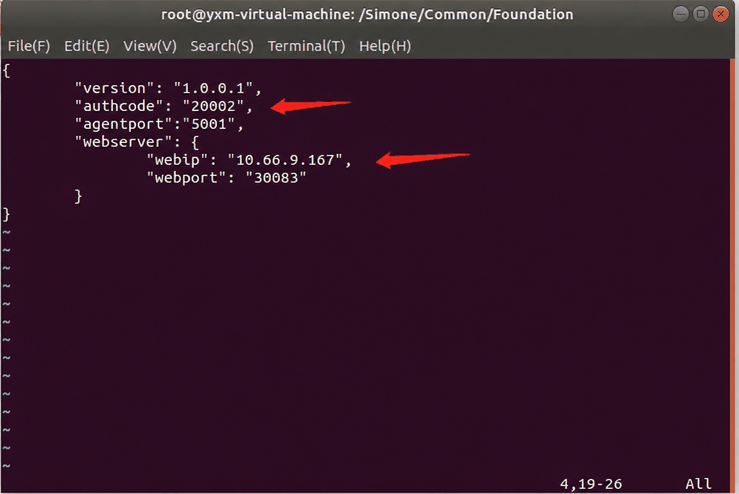
(3) Change authcode to the UUID of the Agent created in the Master's Agent List, and change webip to the Master's actual IP address. Save and exit.
(4) In the /home/unreal/.simone directory, clear the contents of SimOneOS.conf. Exit the container and restart SimOne.

(5) Open the Agent List on the Master. Agent2 with UUID 20002 should appear as connected (shown in green), displaying the Agent's IP address and operating system (Linux).