Product Installation
The following applies to the Collaborative Edition — Client and Enterprise Edition.
1. Windows
1.1 Run the Installer
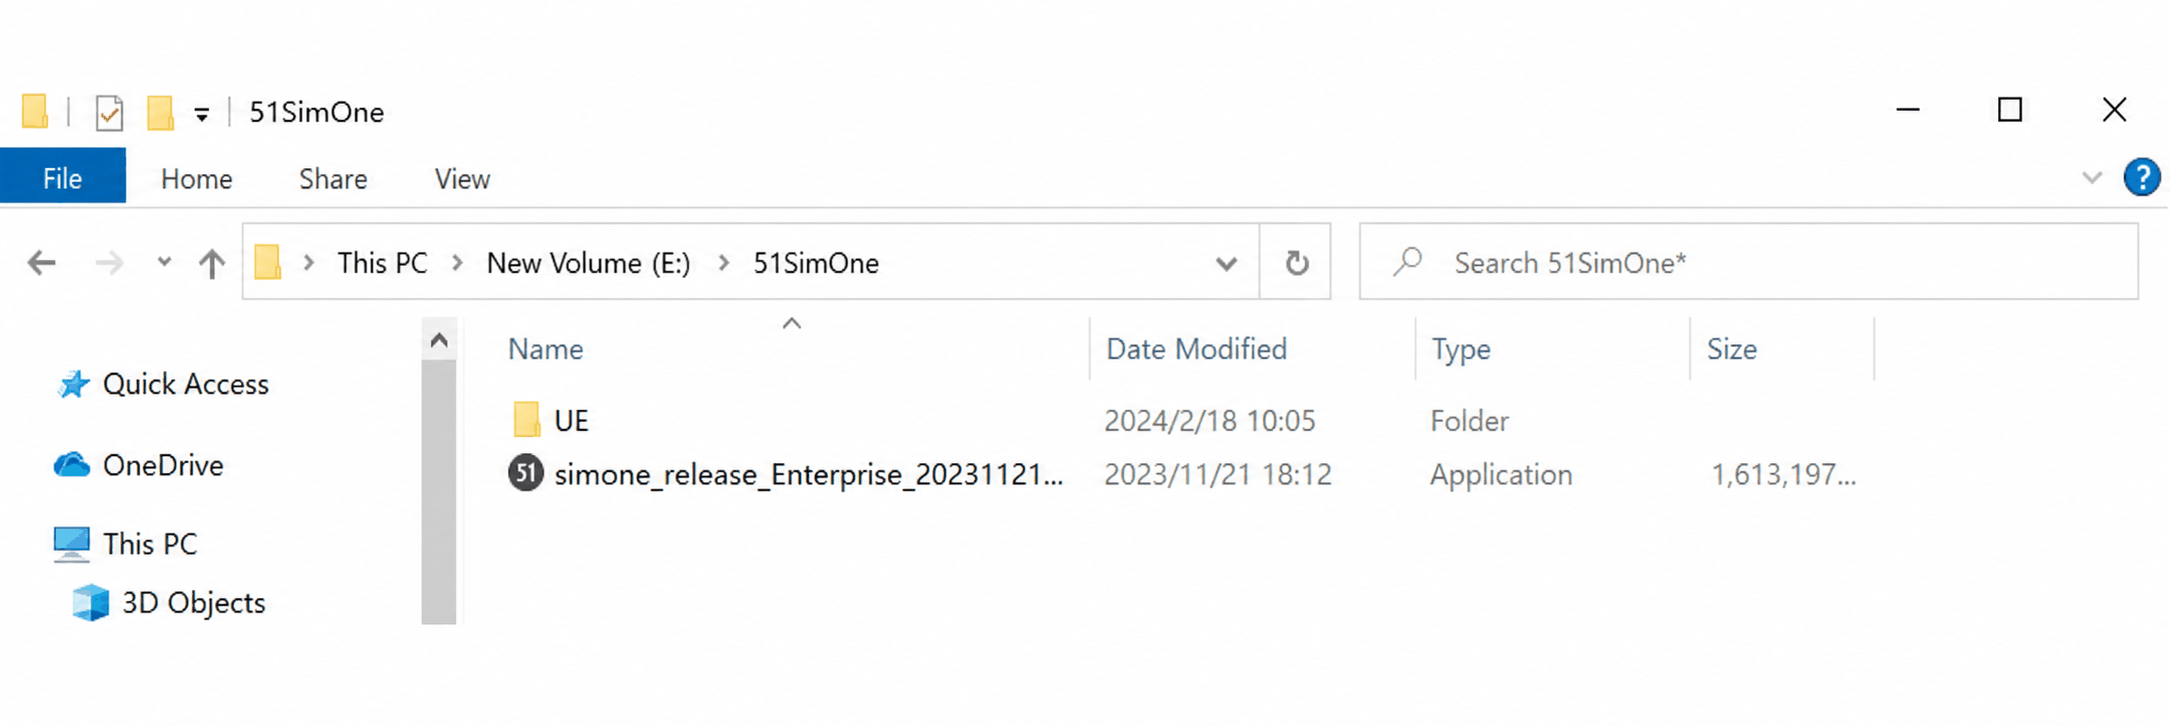
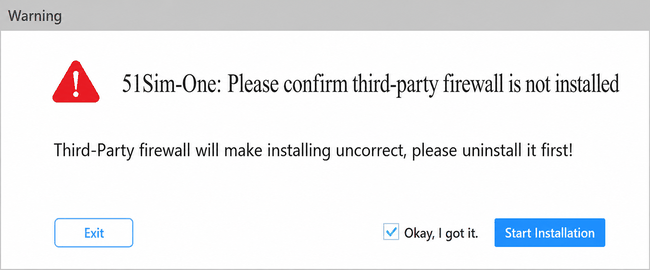
Place the installer and the UE folder in the same directory. Run the installer and follow the prompts to disable the system firewall before proceeding.
1.2 Select Installation Type
Select either Master (includes Master and Agent) or Distributed — Agent. Choose to install in Administrator Mode, then click Next.
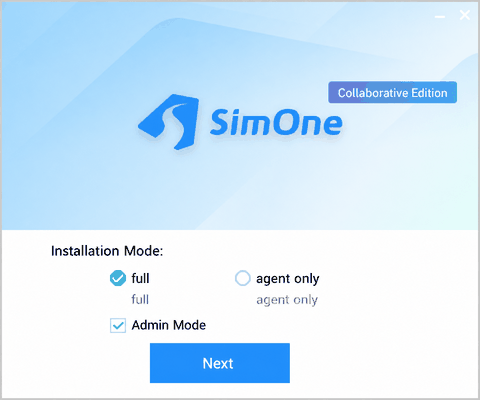
If ✅ Administrator Mode is checked, the system starts processes via system services.
If a background process crashes for any reason, the system service will automatically restart it using administrator privileges.
If 🔲 Administrator Mode is unchecked, the system starts processes via scripts.
If a background process crashes for any reason, the system cannot restart it automatically — only manual restart is possible.
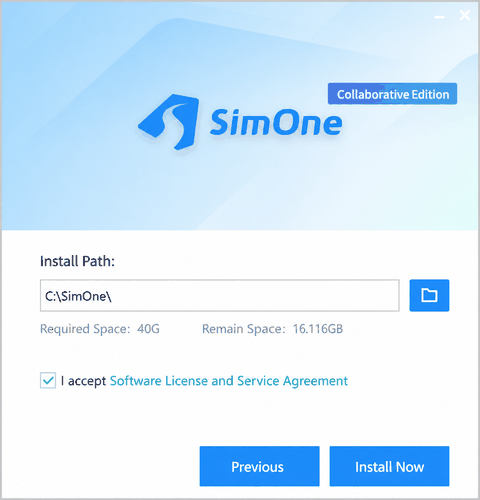
1.3 Select Installation Path
Enter the installation path in the path field, check I have read and agree to the Software License and Service Agreement, and click Install Now.
Before installing, manually verify that the available disk space meets the minimum requirement of 40 GB.
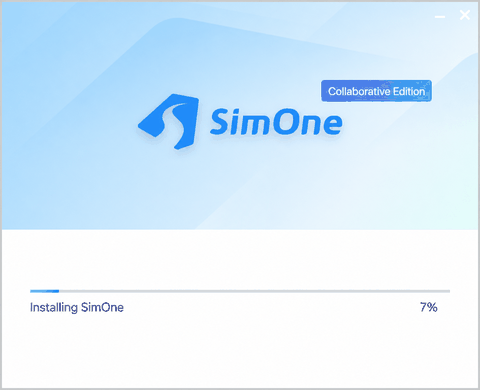
1.4 Wait for Installation to Complete
The system automatically installs the rendering engine. This process may take some time — please be patient. (If Administrator Mode was selected, an authorization prompt may appear once during installation.)
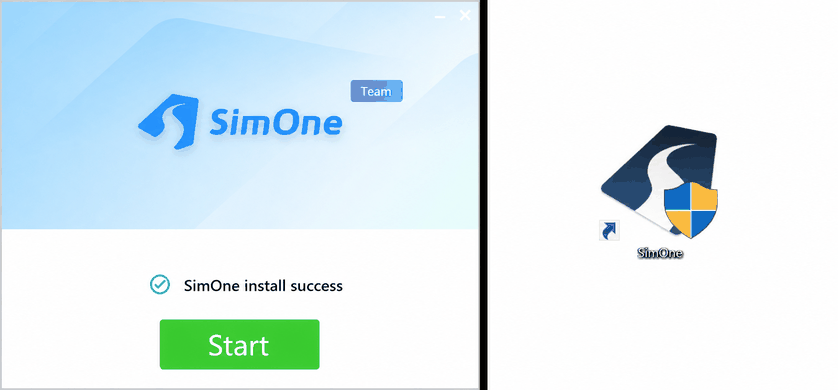
1.5 Launch SimOne After Installation
After installation is complete, click Get Started to launch SimOne. A desktop shortcut is also created for easy access.
1.6 Change the Server Address (Collaborative Edition Only)
(1) Open the SimOneLauncher system tray and change the default server address to your own server address.
(2) Click Stop and then Start to restart SimOne.
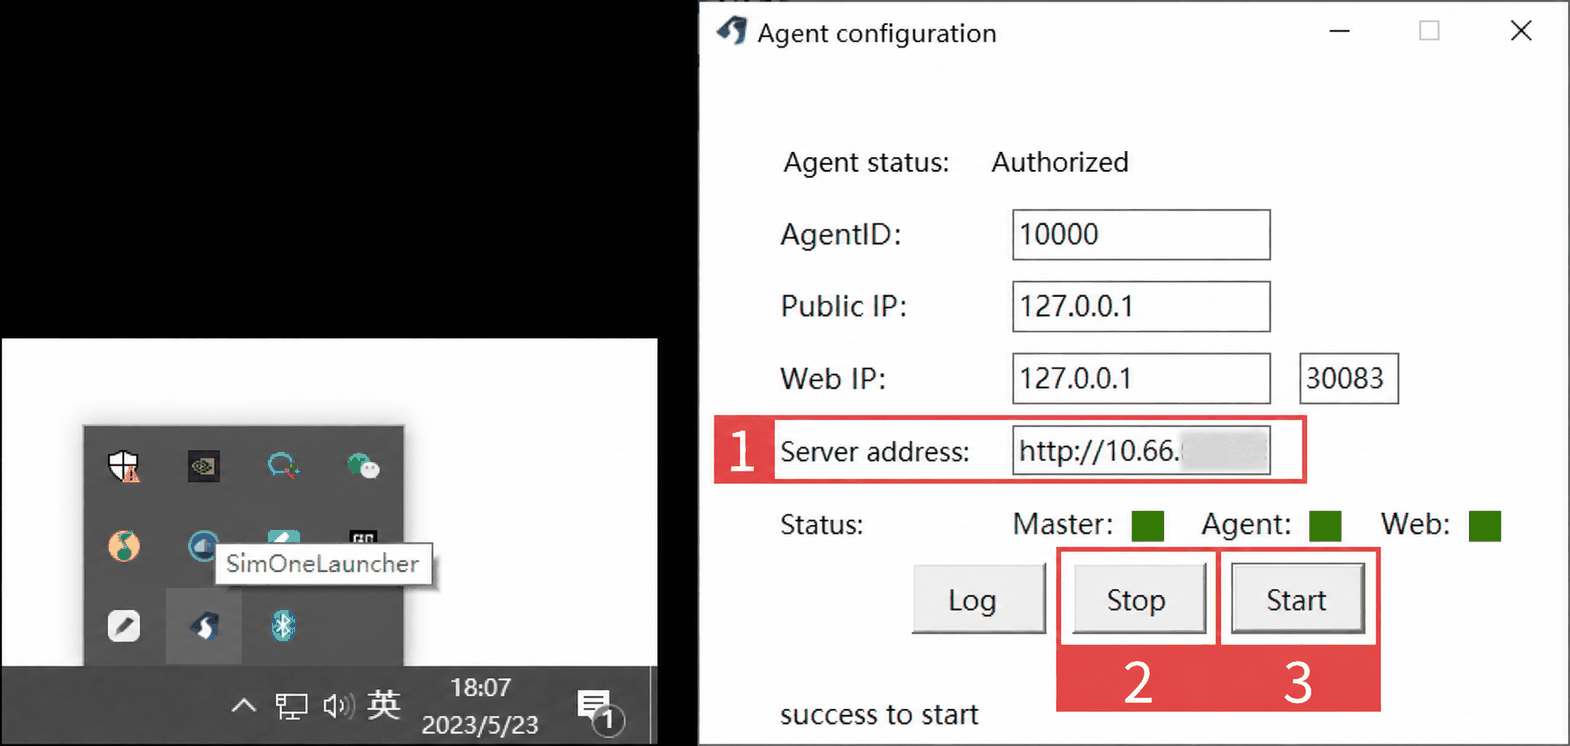
For users who need to integrate algorithms or set up a multi-vehicle distributed system, refer to Distributed System for further configuration.
The following applies to the Collaborative Edition — Client and Enterprise Edition (Linux).
2. Linux
The Linux version of SimOne requires users to configure the runtime environment manually. This approach allows flexible adjustment of GPU driver and Docker versions based on your hardware and requirements.
2.1 Install Ubuntu
This document describes the installation steps for Ubuntu 20.04. If your machine runs CentOS or another Linux distribution, first install Ubuntu 20.04.

2.2 Install Docker CE (Community Edition)
(1) Update the existing package list:
sudo apt update
Install dependencies to allow apt to support HTTPS:
sudo apt install apt-transport-https ca-certificates curl software-properties-common
(2) Add the official Docker GPG key and the Alibaba Cloud mirror repository:
sudo install -m 0755 -d /etc/apt/keyrings
curl -fsSL https://download.docker.com/linux/ubuntu/gpg | sudo gpg --dearmor --batch --yes -o /etc/apt/keyrings/docker.gpg
sudo chmod a+r /etc/apt/keyrings/docker.gpg
echo \
  "deb [arch=$(dpkg --print-architecture) signed-by=/etc/apt/keyrings/docker.gpg] https://mirrors.aliyun.com/docker-ce/linux/ubuntu $(. /etc/os-release && echo "$VERSION_CODENAME") stable" | sudo tee /etc/apt/sources.list.d/docker.list > /dev/null
Update the package list again:
sudo apt update
(3) To verify that Docker installs from the Docker repository rather than Ubuntu's default repository:
apt-cache policy docker-ce
The output will look similar to the following (exact output may vary):
docker-ce:
Installed: (none)
Candidate: 5:19.03.9~3-0~ubuntu-focal
Version table:
    5:19.03.9~3-0~ubuntu-focal 500
        500 Index of linux/ubuntu/ focal/stable amd64 Packages
The output shows that docker-ce (community edition) is not yet installed.
(4) Start installation:
Query available Docker versions — version 26 is recommended:
apt-cache madison docker-ce
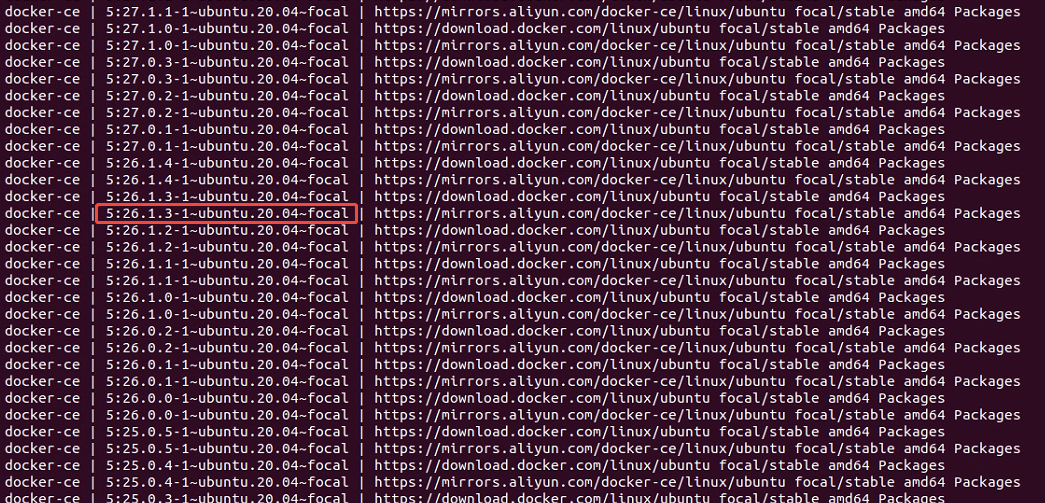
Install a specific version based on the query results:
sudo apt-get update
sudo apt install docker-ce=[version] docker-ce-cli=[version] -y
Example:
sudo apt install docker-ce=5:26.1.3-1~ubuntu.20.04~focal docker-ce-cli=5:26.1.3-1~ubuntu.20.04~focal -y
Docker should now be installed, with the daemon running and autostart enabled. Check the Docker status:
sudo systemctl status docker
Output:
Output
● docker.service - docker Application Container Engine
   Loaded: loaded (/lib/systemd/system/docker.service; enabled; vendor preset: enabled)
   Active: active (running) since Tue 2020-05-19 17:00:41 UTC; 17s ago
 TriggeredBy: ● docker.socket
     Docs: https://docs.docker.com
 Main PID: 24321 (dockerd)
    Tasks: 8
   Memory: 46.4M
   CGroup: /system.slice/docker.service
           └─24321 /usr/bin/dockerd -H fd:// --
containerd=/run/containerd/containerd.sock
(5) Enable autostart on boot:
sudo systemctl enable docker
2.3 Install SimOne
The installation path must not contain double spaces or Chinese characters.
(1) Copy the installer to the target directory and extract SimOne_Linux_Enterprise.zip.
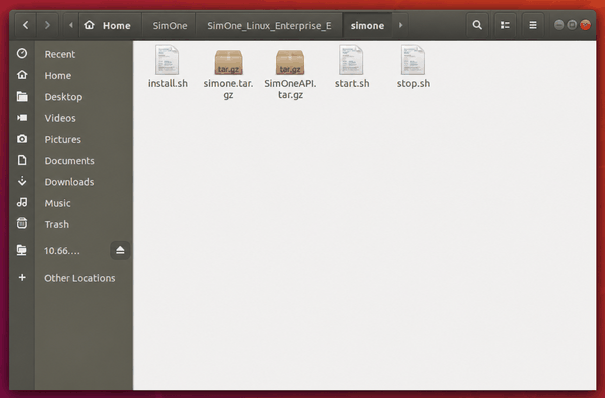
(2) In the extracted folder, navigate into the SimOne subdirectory, right-click, and select Open in Terminal.
(3) Run sudo ./install.sh to start the automated SimOne installation.
2.4 Install GPU Driver
2.4.2 Method 1
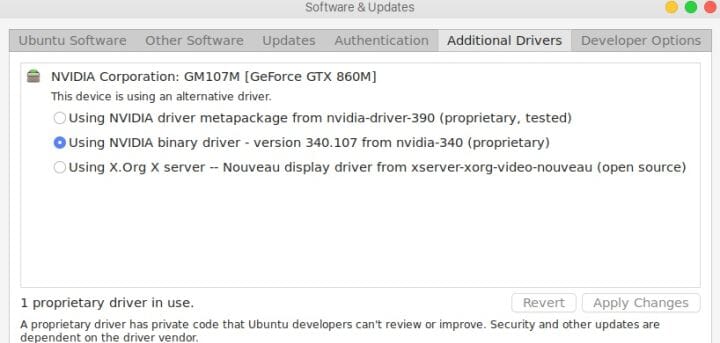
(1) Open Software & Updates:
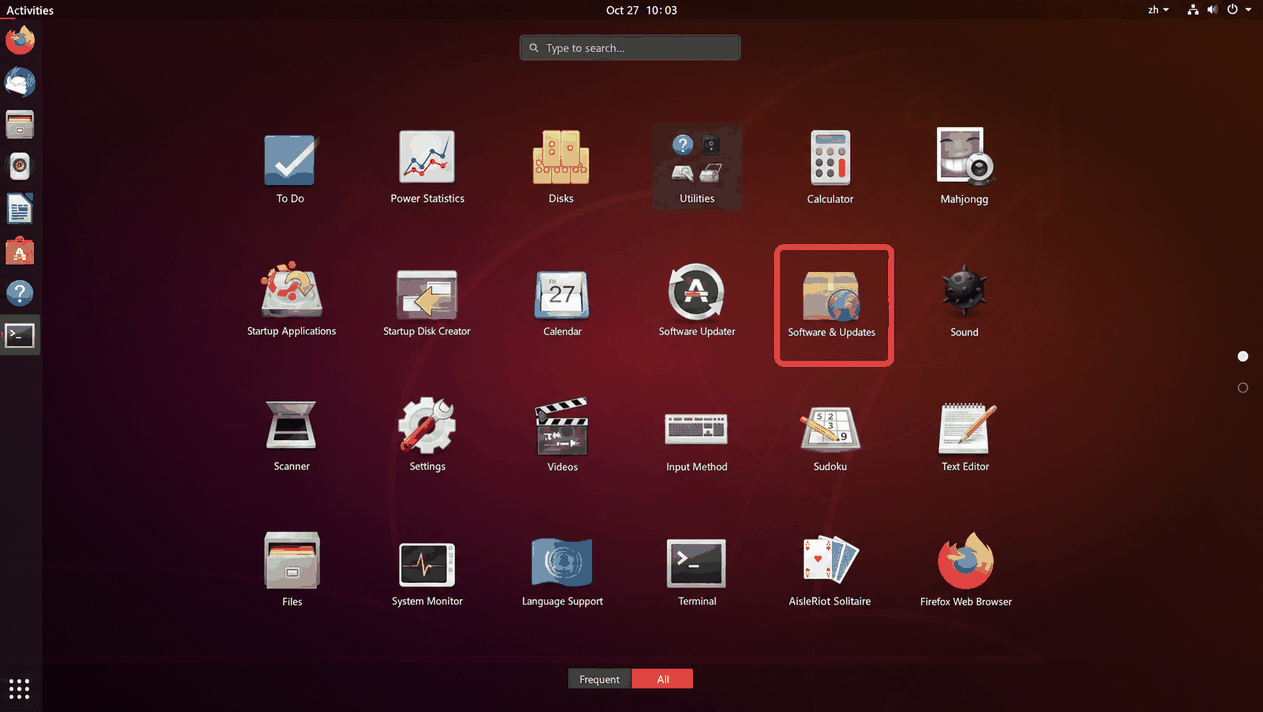
(2) Select the Additional Drivers tab. If a driver is already installed, the system shows it as in use (as shown). If not, the system automatically detects your GPU and displays the corresponding driver options. After selecting a driver, restart the machine to complete installation.
2.4.1 Method 2
(1) Check the GPU model: enter in the terminal
ubuntu-drivers devices
This displays the installed GPU model and the recommended driver version.
(2) To install the recommended driver automatically:
sudo ubuntu-drivers autoinstall
To install a specific version using apt:
sudo apt install nvidia-xxx
Accept all default prompts during installation.
(3) After installation, restart the system. The NVIDIA GPU will then function normally.
2.5 Install nvidia-docker2 (NVIDIA Container Toolkit)
(1) Add the NVIDIA repository:
curl -fsSL https://nvidia.github.io/libnvidia-container/gpgkey | \
  sudo gpg --dearmor -o /usr/share/keyrings/nvidia-container-toolkit-keyring.gpg
curl -s -L https://nvidia.github.io/libnvidia-container/stable/deb/nvidia-container-toolkit.list | \
  sed 's#deb https://#deb [signed-by=/usr/share/keyrings/nvidia-container-toolkit-keyring.gpg] https://#g' | \
  sudo tee /etc/apt/sources.list.d/nvidia-container-toolkit.list
If access to nvidia.github.io is slow, use the Alibaba Cloud mirror:
curl -fsSL https://mirrors.aliyun.com/nvidia-docker/gpgkey | \
  sudo gpg --dearmor -o /usr/share/keyrings/nvidia-container-toolkit-keyring.gpg
curl -s -L https://mirrors.aliyun.com/nvidia-docker/ubuntu22.04/amd64/nvidia-docker.list | \
  sudo tee /etc/apt/sources.list.d/nvidia-container-toolkit.list
(2) Update and install:
sudo apt-get update
sudo apt-get install -y nvidia-docker2
(3) Restart the Docker service to apply changes:
sudo pkill -SIGHUP dockerd
sudo systemctl daemon-reload
sudo systemctl restart docker
2.6 Install UE
UE depends on the GPU for high-performance rendering. To avoid installation failures or runtime issues, complete the GPU driver configuration before running the UE installation script.
The installation path must not contain double spaces or Chinese characters.
(1) Copy the installer to the target directory and extract SimOne-ue-enterprise-release.
(2) In the extracted folder, navigate into the SimOne-ue subdirectory, right-click, and select Open in Terminal.
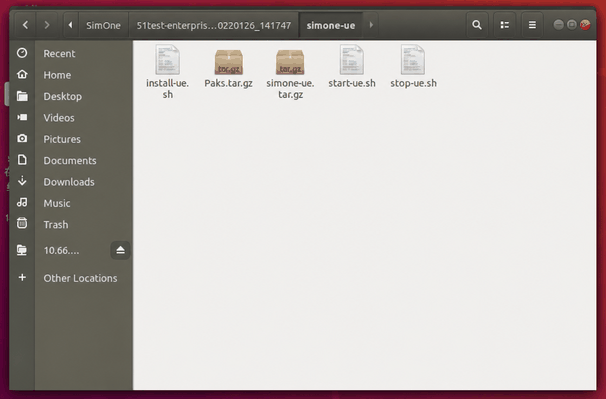
(3) Run sudo ./install-ue.sh. The system automatically installs the UE package. Follow the default prompts and wait for the installation to complete. If prompted for a Web IP, enter the machine's IP address.
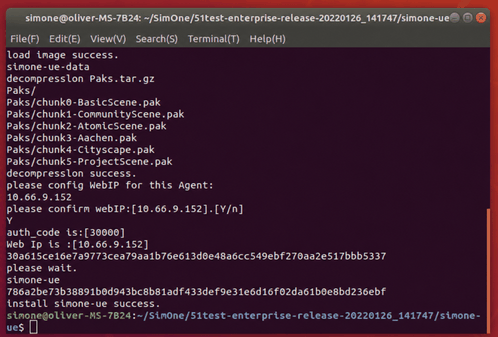
(4) After successful installation, start UE before using high-fidelity rendering by running sudo ./start-ue.sh in the same directory. To stop UE, run sudo ./stop-ue.sh.
2.7 Configure Cloud Server Address (Collaborative Edition Only)
(1) Open /var/lib/docker/volumes/simone-data/_data/config.json and update the cloud server address.
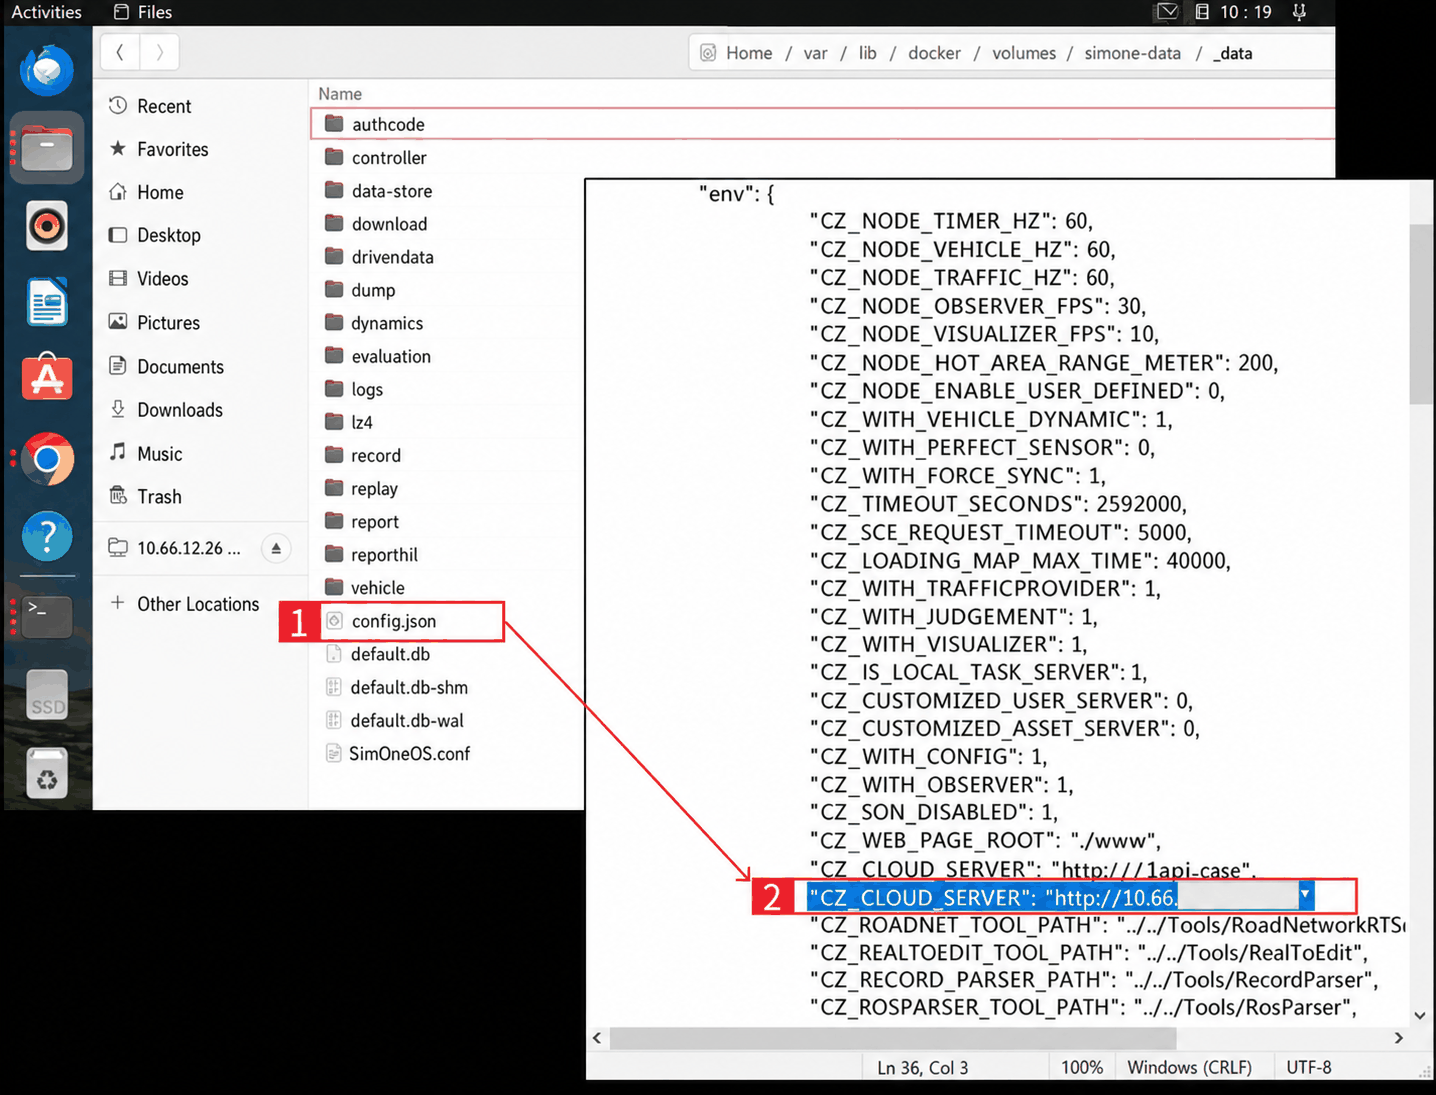
(2) After making changes, insert the USB dongle if available (<span style="color: rgb(216,57,49)">Without a USB dongle, the client can only edit Use Cases but cannot run them). In the SimOne installation directory, run sudo ./start.sh to start SimOne. When SimOne (the Docker container name) appears, startup is successful.
(3) Open a browser and go to localhost:30083 to access the SimOne interface.
(4) To stop the software, run sudo ./stop.sh in the same directory.
After subsequent changes to the server address or re-inserting the USB dongle, SimOne must be restarted.
3. Troubleshooting
3.1 USB Dongle Issues During Installation (Client)
C-NCAP2021-CCRm-AEB-40km/h, USB dongle verification failed
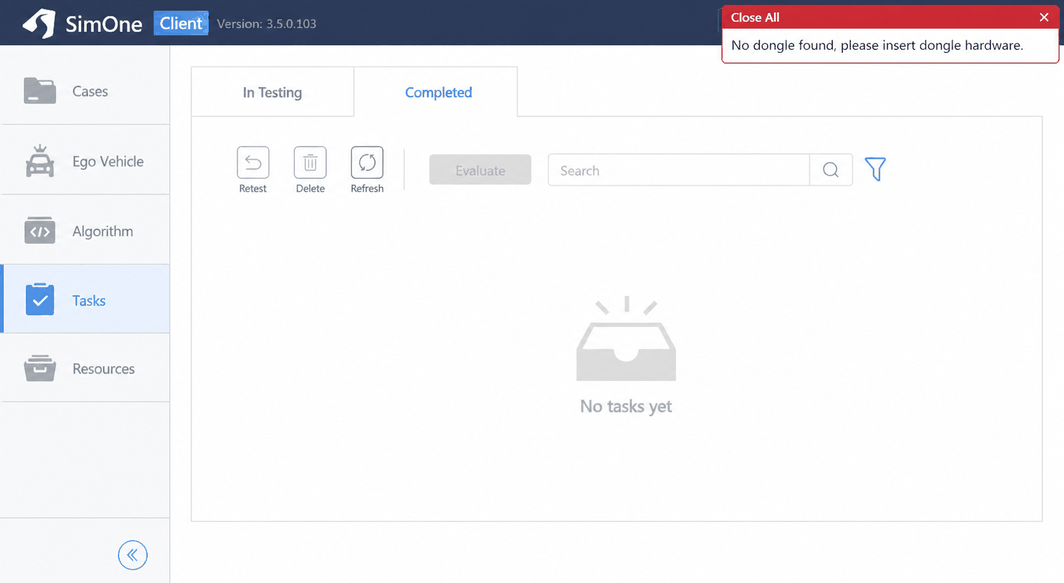
After SimOne is successfully installed, the software operates normally if the USB dongle is correctly inserted. If the dongle is removed during operation, or was not inserted during installation, the interface still loads. However, after selecting a Use Case to run, a prompt appears in the upper-right corner notifying the user that no USB dongle is detected and the Use Case cannot run.
3.2 Issues Caused by Incorrect Installation Path
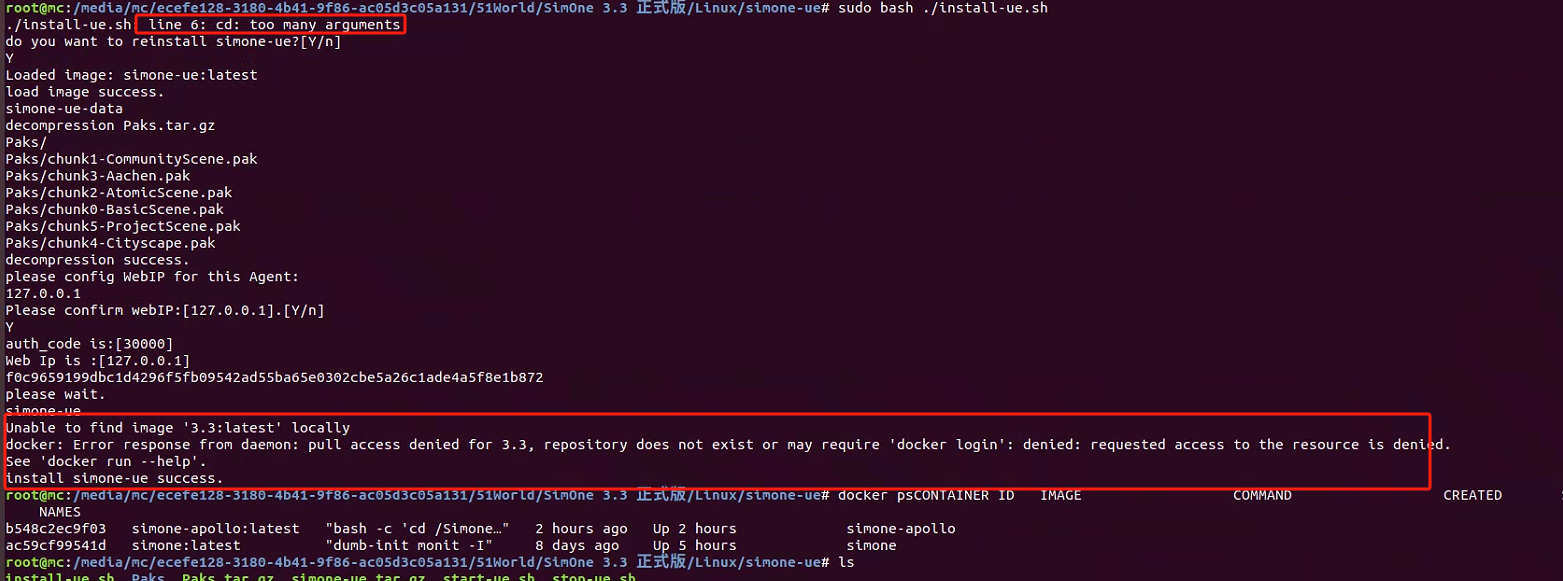
- line 6: cd: too many arguments
- unable to find image '3.3:latest' locally
- docker:Error response from daemon: pull access denied for 3.3, repository does not exist or may require 'docker login': denied: requested access to the resource is denied.
- See 'docker run --help'.
install SimOne-ue success.
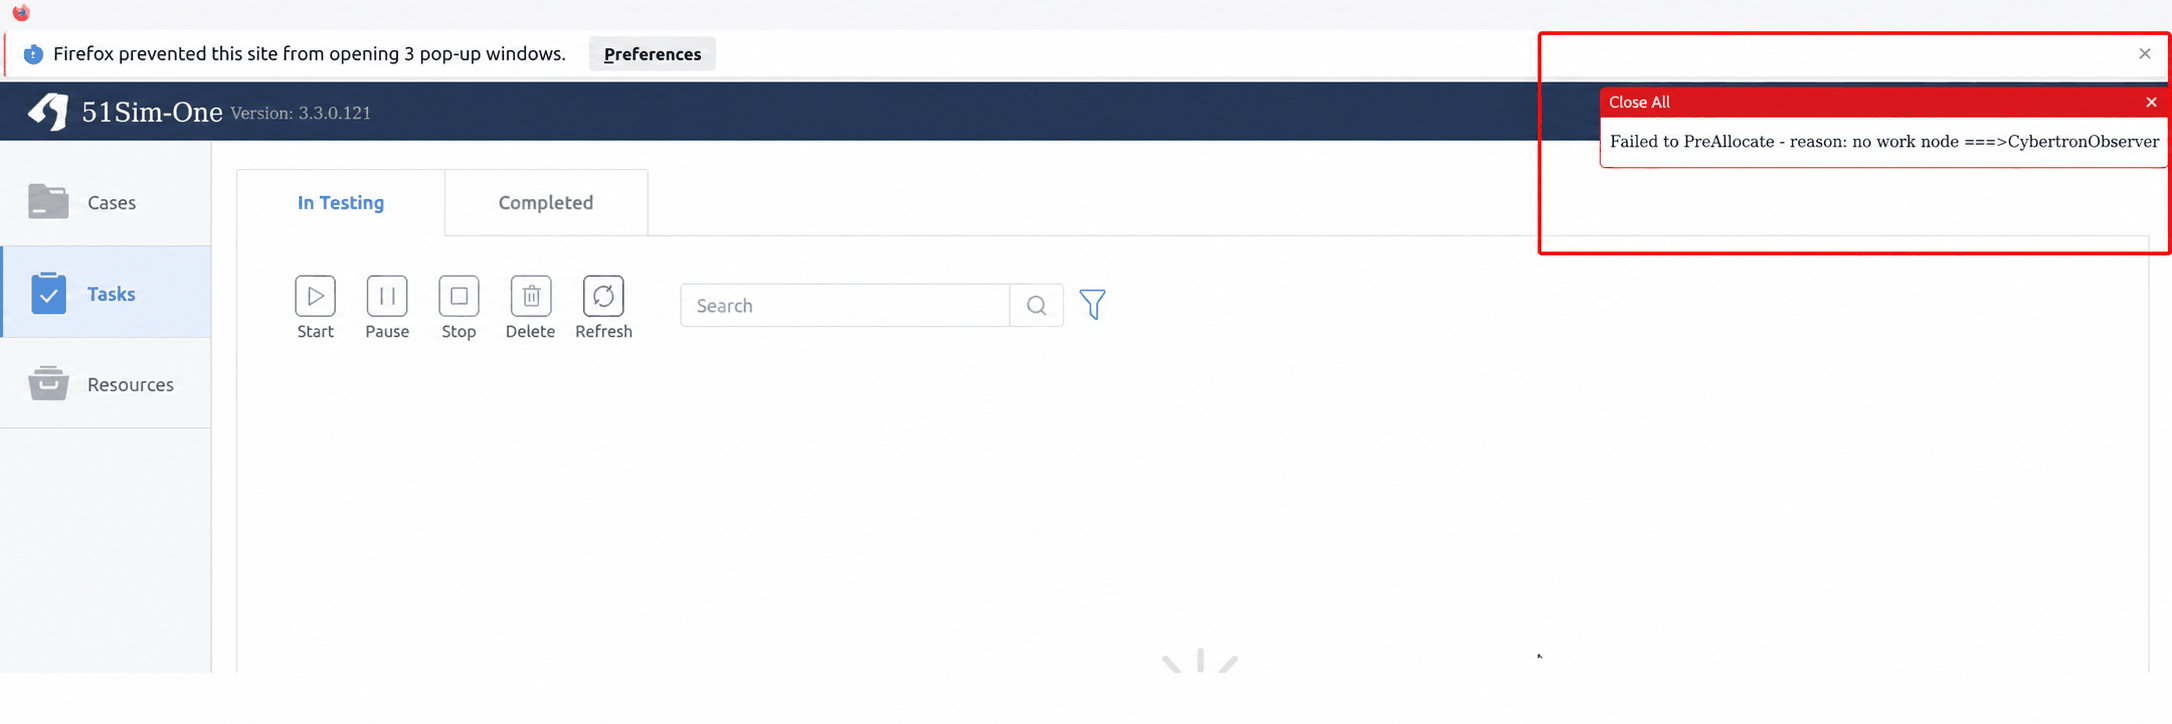
Failed to PreAllocate - reason: no work node ==>CybertronObserver
The installation path must not contain double spaces or Chinese characters. When the UE installation fails, the simulation engine cannot be found at runtime, resulting in the errors shown below.